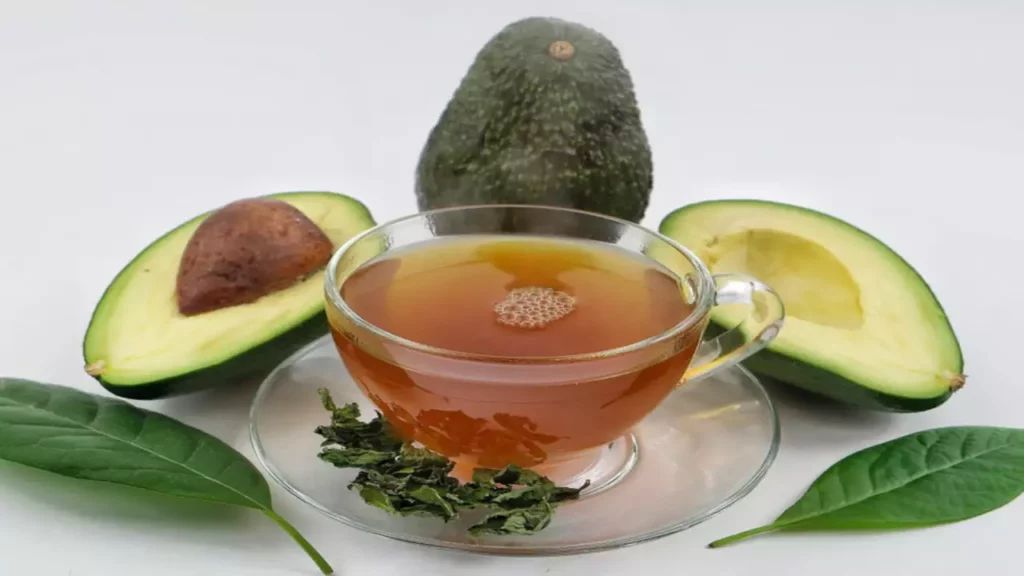
Category

Health & Wellness

Category

Introduction:

Brighten your mornings with a cup of turmeric coffee, an invigorating drink that combines the rich, deep flavors of coffee with the vibrant, health-enhancing properties of turmeric. This delightful concoction not only wakes you up but also gives you a health boost to start your day right. Let’s explore how to make this aromatic and beneficial morning beverage.

Why Turmeric Coffee?

Turmeric coffee is more than just your average morning brew. It includes:

  • Turmeric: Known for its anti-inflammatory and antioxidant properties, turmeric adds a spicy, earthy flavor and a host of health benefits to your coffee.
  • Cream: Adds smoothness and a touch of luxury to the coffee, balancing the spice of turmeric beautifully.

Ingredients:

  • 1 cup of freshly brewed coffee
  • 1/2 teaspoon turmeric powder
  • 1 tablespoon cream (or a dairy-free alternative if you prefer)
  • Optional: honey or a sweetener of choice, to taste
  • A pinch of black pepper (to enhance turmeric absorption)

Preparation Steps:

  1. Brew Your Coffee:
    • Start by brewing your favorite coffee. Whether you use a coffee maker, French press, or any other method, ensure your coffee is hot and strong.
  2. Enhance with Turmeric:
    • Add the turmeric powder directly to your hot coffee. Turmeric is fat-soluble, so it pairs perfectly with the creamy component of this drink.
  3. Add Cream and Extras:
    • Stir in the cream to blend everything smoothly. If you like your coffee sweet, add honey or another sweetener to your taste.
    • Sprinkle a pinch of black pepper into the cup. This might sound unusual, but black pepper is known to help your body absorb curcumin, the active compound in turmeric.
  4. Mix and Serve:
    • Mix all the ingredients well until the coffee takes on a golden hue and the turmeric is well incorporated. Ensure the beverage is smooth and creamy.

Health Benefits:

Drinking turmeric coffee can be a great way to incorporate a powerful anti-inflammatory into your diet. Turmeric is beneficial for reducing inflammation and joint pain, promoting digestion, and even potentially lowering anxiety levels, making it a perfect start to the day for both body and mind.

Conclusion:

Turmeric coffee is a simple, tasty, and healthful twist on your morning routine. This beverage not only invigorates your senses with its rich flavor but also imparts numerous health benefits, ensuring you start your day on a positive and healthy note. Try introducing turmeric coffee into your mornings and feel the difference in your daily well-being!


Are you ready to kickstart your day with a burst of energy and flavor? Look no further than your morning cup of coffee! But wait, we’re not talking about just any ordinary cup of joe. We’re talking about a magical concoction that will not only awaken your senses but also provide a plethora of health benefits. Introducing the Turmeric Coffee Recipe – a delightful blend that will revolutionize your mornings in just five minutes!

Step 1: Gather Your Ingredients

First things first, let’s gather all the goodies you’ll need to brew up this golden elixir:

  • Freshly brewed coffee
  • Ground turmeric
  • Honey or your preferred sweetener
  • Milk or plant-based alternative
  • A dash of cinnamon (optional but highly recommended for extra warmth and flavor)

Step 2: Brew Your Coffee

Start by brewing your favorite coffee just the way you like it. Whether you prefer a bold espresso shot or a smooth drip brew, the choice is yours! Make sure it’s hot and ready to mingle with the other ingredients.

Step 3: Spice it Up with Turmeric

Now comes the star ingredient – turmeric! Sprinkle a generous pinch of ground turmeric into your coffee cup. Not only does turmeric add a vibrant hue to your beverage, but it also brings a myriad of health benefits, including anti-inflammatory properties and immune system support.

Step 4: Sweeten to Taste

To balance out the earthy notes of turmeric, add a dollop of honey or your preferred sweetener. Adjust the sweetness according to your taste preferences – whether you like it slightly sweet or super saccharine, it’s all about making it just right for you.

Step 5: Creamy Goodness

Pour in some milk or your favorite plant-based alternative to add creaminess to your turmeric coffee. Whether you opt for velvety whole milk or creamy coconut milk, this step will elevate your beverage to new heights of indulgence.

Step 6: Optional Finishing Touch

Feeling fancy? Sprinkle a dash of cinnamon on top of your turmeric coffee for an extra layer of flavor and aroma. This optional step adds a delightful warmth that complements the spices beautifully.

Step 7: Sip and Enjoy!

Voila! Your invigorating turmeric coffee is ready to be savored. Take a moment to inhale the enticing aroma before taking that first sip. Feel the warmth spreading through your body as you indulge in this delicious and nutritious morning treat.

So, why settle for ordinary coffee when you can indulge in a rejuvenating cup of turmeric-infused bliss? With just a few simple ingredients and a couple of minutes, you can transform your mornings into a golden ritual of health and happiness. Cheers to a brighter, bolder start to your day!


Are you craving a delicious dessert but want to keep it healthy and hassle-free? Look no further than this nutritious No-Oven Banana Upside Down Cake recipe! With just one egg and two ripe bananas, you can whip up a delightful treat that satisfies your sweet tooth while nourishing your body.

Step 1: Gather Your Wholesome Ingredients

Let’s kick things off by gathering all the wholesome ingredients you’ll need for this super simple recipe:

  • 1 egg, packed with protein and essential nutrients
  • 2 ripe bananas, loaded with potassium and natural sweetness
  • 1 cup of whole wheat flour, for added fiber and nutrients
  • 1/2 cup of coconut sugar or honey, for natural sweetness
  • 1/4 cup of unsweetened almond milk or any milk alternative, for a dairy-free option
  • 1/4 cup of melted coconut oil or olive oil, for heart-healthy fats
  • 1 teaspoon of baking powder, to help the cake rise
  • A pinch of salt, to enhance the flavors
  • Optional: cinnamon or nutmeg for a warm, comforting touch

Step 2: Mash and Mix

Start by mashing the ripe bananas in a mixing bowl until smooth and creamy. Then, add in the egg, melted coconut oil, coconut sugar or honey, and almond milk. Mix everything together until well combined.

Step 3: Incorporate the Dry Ingredients

In a separate bowl, combine the whole wheat flour, baking powder, and a pinch of salt. Gradually add the dry ingredients to the banana mixture, stirring gently until just combined. Be careful not to overmix, as this can result in a dense cake.

Step 4: Cook with Ease

Preheat a non-stick skillet or frying pan over medium heat. Pour the batter into the pan and spread it out evenly with a spatula.

Step 5: Flip and Enjoy

Once the bottom of the cake is golden brown and set (about 5-7 minutes), carefully flip it over using a plate or spatula to reveal the caramelized banana topping. Cook for an additional 5-7 minutes, or until the other side is golden brown and cooked through.

Step 6: Serve Up Health and Happiness

Remove the banana upside down cake from the pan and let it cool slightly before slicing and serving. Each bite will be a guilt-free indulgence, packed with wholesome ingredients and bursting with natural flavors. Enjoy it as a nutritious dessert or a satisfying snack any time of day!

With this easy-to-follow recipe, you can treat yourself to a healthy and delicious dessert without any oven hassle. So why wait? Dive into this No-Oven Banana Upside Down Cake and savor every nourishing bite!


Are you looking to add a touch of homemade goodness to your meals without the hassle of shopping in stores? Say hello to the easiest and most satisfying DIY project: homemade paneer! With just two simple ingredients – milk and lemon juice – you can create creamy, flavorful paneer right in the comfort of your own kitchen.

Step 1: Gather Your Ingredients

Let’s start by gathering the two magical ingredients you’ll need for this super simple recipe:

  • Milk: Opt for fresh, whole milk for the creamiest paneer.
  • Lemon Juice: Freshly squeezed lemon juice will work wonders in curdling the milk.

Step 2: Prepare the Milk

Pour the milk into a saucepan and heat it gently over medium-low heat. Stir occasionally to prevent the milk from scorching. You want to heat the milk until it’s just about to boil – you’ll start to see tiny bubbles forming around the edges of the pot.

Step 3: Add the Lemon Juice

Once the milk is hot but not boiling, remove it from the heat and slowly pour in the lemon juice while stirring gently. You’ll notice the milk beginning to curdle and separate into curds and whey. Keep stirring until the curds have completely separated from the whey.

Step 4: Strain and Rinse

Place a fine mesh sieve or cheesecloth-lined colander over a bowl and carefully pour the curdled milk mixture into it. Allow the whey to drain off, leaving behind the creamy paneer curds. Rinse the paneer under cold water to remove any traces of lemon juice and help it cool down.

Step 5: Shape and Enjoy

Once the paneer has cooled and drained, gather it into a ball and gently press out any excess moisture. You can then shape it into a block or slice it into cubes, depending on your preference. Your homemade paneer is now ready to be enjoyed in your favorite dishes!

From creamy curries to savory snacks, homemade paneer adds a delightful touch to any meal. Plus, making it yourself means you know exactly what’s going into it – no mystery ingredients or preservatives here! So why not give it a try and experience the joy of creating something delicious from scratch, right in your own kitchen?


Are you tired of dealing with the discomfort and unsightly appearance of varicose veins? Say goodbye to those pesky veins with a simple and natural remedy that might just be hiding in your kitchen – onions! Yes, you read that right. This humble vegetable, often overlooked in its medicinal potential, can work wonders in alleviating varicose veins and promoting healthy circulation.

Step 1: Uncover the Healing Powers of Onions

Onions are not just a flavorful addition to your favorite dishes; they also contain compounds that possess anti-inflammatory and antioxidant properties. These properties make onions a valuable ally in combating varicose veins by reducing swelling and improving blood flow.

Step 2: Prepare Your Onion Poultice

Creating an onion poultice is a simple yet effective way to harness the healing powers of this vegetable. Start by finely chopping or blending a fresh onion until you have a thick paste. You can also mix in a bit of water or oil to create a smoother consistency.

Step 3: Apply the Poultice

Once you have your onion paste ready, apply it directly to the affected areas of your skin where varicose veins are present. Gently massage the paste into your skin and leave it on for about 30 minutes to an hour. For best results, repeat this process daily until you notice an improvement in your varicose veins.

Step 4: Embrace the Benefits

The natural compounds found in onions work to reduce inflammation, strengthen blood vessels, and improve circulation, ultimately helping to diminish the appearance of varicose veins over time. Plus, using onions as a remedy is safe, cost-effective, and easily accessible for everyone.

Step 5: Maintain Healthy Habits

While onions can work wonders in treating varicose veins, it’s also essential to maintain a healthy lifestyle to support overall vein health. This includes staying hydrated, eating a balanced diet rich in fruits and vegetables, exercising regularly, and avoiding prolonged periods of sitting or standing.

Step 6: Enjoy the Results

With regular application and a commitment to healthy habits, you’ll soon notice a significant improvement in the appearance and discomfort of your varicose veins. Say hello to smoother, healthier-looking legs and bid farewell to those troublesome veins for good!

So, why wait? Head to your kitchen, grab a few onions, and start harnessing the incredible healing power of this household treasure. Your veins will thank you for it!

Introduction

When it comes to natural remedies for various aches like leg pain, rheumatism, varicose veins, arthritis, headaches, and joint pain, sometimes traditional wisdom holds the key. One of the lesser-known yet remarkably effective treatments comes from a common kitchen staple: the onion. This humble vegetable is at the heart of a time-tested remedy that many swear by for easing discomfort and reducing symptoms.

Why Onions?

Onions aren’t just for adding flavor to dishes; they possess medicinal properties that can help tackle several ailments:

  • Anti-inflammatory: Onions are rich in quercetin, a potent antioxidant that helps reduce inflammation and pain.
  • Circulatory Benefits: Their natural properties can improve blood circulation, which is beneficial for reducing swelling and alleviating varicose veins.
  • Pain Relief: Onions have been used historically to relieve pain, including headaches and joint pains.

How to Use Onions for Pain Relief

Incorporating onions into your routine for pain management can be done in a few simple ways:

  1. Onion Poultice:
    • Preparation: Chop an onion finely and either microwave it for about 30 seconds or sauté it lightly just until warm.
    • Application: Place the warm onions in a thin cloth and apply it directly to the affected area. Secure it with a bandage or wrap and let it sit for at least 20 minutes.
    • Frequency: Repeat this process daily or as needed for relief.
  2. Onion Juice Compress:
    • Preparation: Juice or blend an onion to extract its liquid.
    • Application: Soak a clean cloth in the onion juice and apply it as a compress to sore joints or muscles.
    • Benefit: This method is especially good for headaches. Apply the compress to the forehead or temples.
  3. Dietary Inclusion:
    • Everyday Use: Regularly including onions in your diet can help maintain a healthy inflammation response and support circulatory health.
    • Cooking: Use onions generously in your cooking, whether in salads, stews, or casseroles.

Conclusion

Onions offer a simple yet effective natural remedy for a variety of painful conditions, from arthritis to headaches. By creating poultices, compresses, or simply including more onions in your meals, you can tap into the therapeutic powers of this versatile vegetable. Give this natural remedy a try and feel the difference in your daily comfort and mobility. Here’s to finding relief in your kitchen’s produce drawer!


Battling with toenail fungus can be a lengthy and often frustrating process. However, nature offers its own set of powerful remedies, with turmeric at the forefront for this particular concern. This bright yellow spice, commonly used in cooking, is praised not only for its flavor but also for its impressive medicinal properties. Let’s delve into how turmeric can be your natural ally in treating toenail fungus.

Turmeric’s Antifungal Abilities

Turmeric contains curcumin, a compound that gives the spice its vibrant color and is responsible for most of its health benefits. Curcumin is noted for its potent antifungal and anti-inflammatory properties. It works by effectively inhibiting the growth of a wide range of fungi, including the types that commonly cause toenail infections.

Boosting Immunity

Apart from directly combating fungi, turmeric helps by boosting the body’s immune response. A strong immune system is better equipped to fight off fungal infections and prevent their recurrence. Incorporating turmeric into your daily routine can thus provide a dual benefit—attacking the fungus directly and aiding your body’s natural defenses.

How to Use Turmeric for Toenail Fungus

To harness turmeric’s benefits for toenail fungus, you can use it both internally and externally. Here’s how:

  • Turmeric Tea: Drinking turmeric tea can help enhance your internal immune system. You can make a simple tea by boiling a teaspoon of ground turmeric in water for about 10 minutes. Strain it and add honey or lemon to taste if desired.
  • Topical Paste: For a more direct approach, make a paste using turmeric powder and a small amount of water. Apply this paste directly to the affected nail and cover it with a bandage. Leave it on for at least a few hours or overnight for best results. Repeat daily until you notice improvement.

Precautions

While turmeric is natural and generally safe, it can stain your skin and nails yellow, which is temporary but worth noting. Also, if you are on any medication, particularly blood thinners, it’s important to consult with a healthcare provider before starting regular turmeric consumption as it can interact with some medications.

Final Thoughts

Turmeric offers a simple, natural option for tackling toenail fungus without the side effects associated with conventional treatments. With its natural antifungal and immune-boosting properties, turmeric not only helps in treating the current issue but also aids in preventing future infections. Give this natural remedy a try and see if it can bring you relief from toenail fungus.


Dealing with toenail fungus can be a persistent and annoying problem. Fortunately, natural remedies like cloves offer a gentle yet effective solution. Cloves, a common spice in many kitchens, are not only great for adding flavor to dishes but also have powerful medicinal properties that can help tackle toenail fungus. Let’s explore how you can use cloves to naturally treat this bothersome issue.

Why Cloves?

Cloves are rich in eugenol, a compound with strong antifungal and antiseptic properties. This makes them an excellent choice for naturally combating fungal infections in toenails. Eugenol works by destroying the fungal membranes, effectively killing the fungus and preventing its spread.

Antifungal Clove Oil

One of the most effective ways to use cloves against toenail fungus is in the form of clove oil. This essential oil concentrates the beneficial properties of cloves, making it particularly potent against infections.

How to Use Clove Oil for Toenail Fungus

Using clove oil is simple, and you can prepare a treatment regime at home with just a few steps:

  1. Prepare Your Nails: Cleanse your feet thoroughly and ensure your nails are trimmed and clean. This helps the clove oil penetrate more effectively.
  2. Application: Apply a small amount of clove oil directly to the affected toenail. You can use a cotton swab or a clean brush to apply the oil carefully.
  3. Safety First: Since clove oil is very potent, it’s advisable to dilute it with a carrier oil like coconut or olive oil, especially if you have sensitive skin. A good ratio is 1 part clove oil to 2 parts carrier oil.
  4. Regular Treatment: Apply the clove oil twice daily, once in the morning and once before bed. Consistency is key to seeing results.

Additional Tips

While using clove oil, it’s important to keep the area dry and clean. Fungi thrive in moist environments, so keeping your feet and nails dry can prevent further fungal growth.

Precautions

Be mindful of any irritation or allergic reactions while using clove oil. If you notice any adverse reactions, discontinue use and consult a healthcare provider.

Final Thoughts

Cloves offer a straightforward and natural method to combat toenail fungus without resorting to harsh chemicals. Regular application of clove oil can significantly improve the condition of your nails, reducing the fungus and promoting healthier nail growth. Embrace this spice for more than just its flavor—let it enhance your foot health as well.

Red beets are not just vibrant and flavorful; they’re also packed with vitamins, minerals, and antioxidants that can have significant health benefits. While many are familiar with traditional ways to enjoy beets, such as in salads or juices, there’s a lesser-known recipe that turns this common vegetable into a powerhouse drink. This miracle recipe is easy to prepare and holds numerous health benefits that you might not be aware of.

Why Choose Red Beets?

Red beets are a fantastic source of fiber, folate (vitamin B9), manganese, potassium, iron, and vitamin C. They are known for their ability to improve blood flow, reduce blood pressure, and enhance athletic performance. Additionally, beets have compounds that may improve digestive health and fight inflammation.

The Miracle Beetroot Recipe

This recipe focuses on creating a beetroot tonic that is not only refreshing but also loaded with health benefits. Here’s how you can make it at home:

Ingredients:

  • 2 large red beets
  • 1 lemon
  • 1-inch piece of ginger
  • 2-3 tablespoons of honey (optional)
  • 1 liter of water

Instructions:

  1. Prepare the Beets: Start by washing the beets thoroughly. Peel them and chop into small chunks. This will help extract their juices more effectively.
  2. Simmer: Place the chopped beets in a large pot with water. Bring to a boil, then lower the heat and let it simmer for about 20-30 minutes or until the beets are tender.
  3. Add Flavorings: While the beets are simmering, peel and slice the ginger. Add it to the pot along with the juice of one lemon. This will not only enhance the taste but also add additional health benefits like aiding digestion and boosting immune function.
  4. Sweeten (Optional): Once the mixture is done simmering, remove it from heat. You can stir in honey to taste, which will add a natural sweetness and make the drink more palatable.
  5. Strain and Serve: Strain the mixture to remove all solids. The remaining liquid is your beetroot tonic. It can be served warm or chilled, depending on your preference.

Health Benefits of the Beetroot Tonic

  • Detoxification Support: This tonic supports liver detoxification, potentially improving liver health.
  • Increased Energy: Regular consumption of beetroot juice has been shown to improve energy and vitality, thanks to its ability to help oxygen flow better within the body.
  • Heart Health: The natural nitrates in beets convert to nitric oxide in the body, which can help widen and relax blood vessels, improving blood flow and lowering blood pressure.

Conclusion

This miracle beetroot recipe is more than just a tasty beverage; it’s a powerful health elixir that can help you maintain optimal health. Easy to prepare and delightful to drink, this beetroot tonic is a secret that’s too good not to share. Try it today and reap the bountiful benefits of red beets!

Looking for a simple yet satisfying way to boost your health and tantalize your taste buds? Look no further than this delightful trio: beetroot, apple, and carrot salad. Packed with nutrients, flavor, and crunch, this weekly staple is sure to become your new favorite go-to recipe!

Here’s what you’ll need:

  • Fresh beetroot
  • Crisp apple
  • Sweet carrot

Now, let’s dive into the easy-peasy steps:

  1. Prepare the Ingredients: Start by peeling and grating the beetroot, apple, and carrot. If you’re feeling adventurous, you can even try slicing them into thin matchsticks for a fancier presentation. Remember, the key is to keep it fresh and vibrant!
  2. Mix and Mingle: Once your ingredients are prepped and ready to go, toss them together in a large bowl. Watch as the vibrant colors come together to create a feast for the eyes as well as the taste buds. It’s like a rainbow on your plate!
  3. Dress to Impress: Keep things light and refreshing by drizzling your salad with a simple dressing. A squeeze of lemon juice and a dash of olive oil are all you need to let the natural flavors shine. Feel free to add a sprinkle of your favorite herbs or a pinch of salt and pepper for extra zing.
  4. Serve and Enjoy: Now comes the best part – dig in! Whether you’re enjoying this salad as a light lunch, a refreshing side dish, or a wholesome snack, savor each crisp, juicy bite. Feel the crunch of the carrots, the sweetness of the apples, and the earthy richness of the beetroot dance across your palate.
  5. Repeat Weekly: Once you’ve experienced the joy of this delicious salad, you’ll want to make it a weekly ritual. Not only is it a tasty treat, but it’s also loaded with vitamins, minerals, and antioxidants to keep you feeling your best.

With this simple yet sensational recipe in your repertoire, eating healthy has never been easier or more enjoyable. So grab your grater, embrace the bounty of nature’s bounty, and get ready to savor the goodness of beetroot, apple, and carrot salad! Cheers to your health and happiness!