Category

Gardening

Category

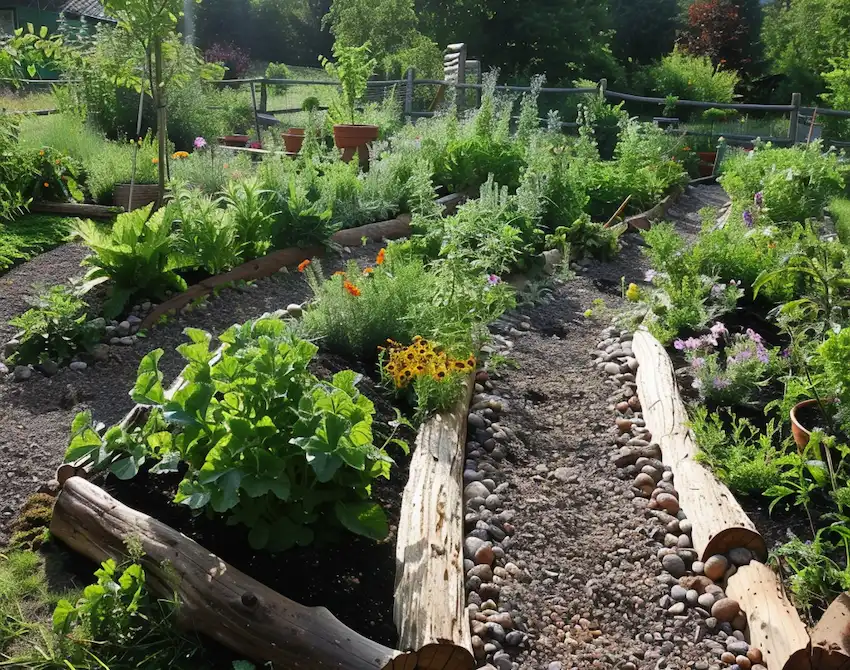
As the winter chill fades away, the promise of spring brings forth a wealth of gardening opportunities. Whether you’re a seasoned green thumb or a novice gardener, now is the time to plan and plant your garden for a vibrant season ahead. This guide will walk you through various vegetables to cultivate, ensuring your garden thrives with color, flavor, and life.

Rooted in Tradition: Quintessential Vegetables

Potatoes and Sweet Potatoes: Versatile staples in gardens worldwide, potatoes and sweet potatoes thrive in various environments, offering hearty yields.

Carrots, Beets, Parsnips, and Radishes: These underground gems are cold-hardy and perfect for early spring planting, promising a bounty of vibrant veggies.

Leafy Greens and Brassicas: Lettuce, Chard, and More

Lettuce: A fast-growing crop with diverse varieties suitable for interplanting, maximizing garden yield.

Chard: A visually stunning and resilient vegetable ideal for smaller garden spaces.

Brassicas: Broccoli, cauliflower, kale, and cabbage, known for their cold resilience, are excellent for interplanting.

The Climbers and Crawlers: Beans, Squashes, and Tomatoes

Beans: Prolific producers adaptable to various spaces, whether bush or runner types.

Summer Squash and Zucchini: Easy-to-grow vegetables yielding abundant harvests, with pest protection strategies.

Tomatoes: Unmatched in flavor, tomatoes come in countless varieties catering to every gardener’s preference.

Flourishing Flora: Sunflowers and Companion Plants

Sunflowers: Towering beauties that attract pollinators and beneficial insects.

Marigolds and Nasturtiums: Beyond aesthetics, these flowers deter pests and act as trap crops.

Culinary Herbs: Basil and Dill

Basil: Indispensable for its culinary versatility, slow-bolting varieties like ‘Everleaf Emerald Towers’ are recommended.

Dill: Besides culinary uses, dill attracts beneficial insects and serves as a host plant for butterfly larvae.

Exotic Additions: Turmeric and Ginger

Turmeric and Ginger: Intriguing choices for exotic flair, requiring a warm growing season and suitable for container gardening.

Conclusion

As you immerse yourself in your garden this spring, remember that each plant nurtured contributes to a greener, more sustainable world. Whether it’s a humble potato or a majestic sunflower, each plays a vital role in your garden’s tapestry. So, put on your gardening gloves and embark on a season of growth, bounty, and beauty. Happy gardening!

In our journey through history, the bond between humanity and nature has been unbreakable, offering not just sustenance but also profound healing. Among nature’s abundant treasures, Yarrow (Achillea millefolium), a humble yet potent herb, stands out as a beacon of medicinal prowess. Let’s explore the remarkable benefits of this botanical wonder and how it can enhance our well-being.

Yarrow: A Medicinal Marvel

Yarrow, also known as milfoil, boasts a rich history steeped in traditional remedies and a diverse array of medicinal properties. From ancient times to modern days, this versatile herb has been utilized in various forms, including infusions, tinctures, salves, and teas, presenting a plethora of wellness benefits waiting to be harnessed.

Unveiling the Benefits:

Delving into the astonishing properties of Yarrow reveals a botanical powerhouse teeming with essential compounds that contribute to its extraordinary health-promoting qualities. Let’s uncover the numerous ways Yarrow can support our well-being:

  1. Hemostatic Marvel: Yarrow’s ability to staunch bleeding has earned it the moniker “soldier’s woundwort,” historically used for wound care on battlefields.
  2. Anti-Inflammatory Wonder: With potent anti-inflammatory properties, Yarrow aids in alleviating conditions such as arthritis, muscle pain, and menstrual cramps.
  3. Digestive Elixir: Yarrow acts as a digestive tonic, stimulating the appetite, easing indigestion, and managing conditions like gastritis.
  4. Immune Support: Compounds like flavonoids and alkaloids in Yarrow bolster the immune system, aiding in infection prevention and faster recovery.
  5. Respiratory Ally: Yarrow’s expectorant qualities provide relief from respiratory discomforts like congestion and coughs.

How to Harness Yarrow’s Healing Power:

To leverage Yarrow’s therapeutic benefits effectively, various preparations can be utilized:

  • Tincture: Concentrated Yarrow extracts offer swift relief and immune support when taken regularly.
  • Infusion: Yarrow infusions combat inflammation and respiratory issues, providing gentle yet effective relief.
  • Salve: Yarrow salves are ideal for topical applications, aiding in wound healing and pain relief.
  • Tea: Yarrow tea, soothing and accessible, aids digestion and relaxation when consumed regularly.
  • Steam Inhalation: Inhaling Yarrow steam eases respiratory discomfort, promoting natural relief.
  • Poultices: Yarrow poultices provide localized relief for wounds, insect bites, and skin irritations.
  • Yarrow Oil: Concentrated Yarrow oil serves as a base for massages and skincare products, enhancing skin health.
  • Yarrow Bath: Adding Yarrow-infused water to baths soothes muscles and benefits the skin, promoting relaxation.
  • Yarrow Compress: Yarrow compresses target inflammation and pain, providing targeted relief.
  • Yarrow Honey: Infusing Yarrow into honey adds a pleasant flavor while offering its therapeutic benefits.

Embracing Nature’s Ally:

Armed with the knowledge of Yarrow’s incredible properties, seize the opportunity to incorporate this botanical ally into your wellness routine. Nature, once again, provides us with a potent resource in our pursuit of holistic well-being. As the ancients proclaimed, “Yarroway, a herb will save the day.”

No matter the frequency of your cleaning regimen, dust remains an ongoing challenge, particularly for those prone to allergies or asthma. However, if conventional cleaning methods prove inadequate in dust control, the inclusion of specific plant varieties might come as a revelation. Certain plants possess remarkable capabilities in filtering contaminants like dust from the air, offering a natural solution that also adds to indoor aesthetics.

Here are some plants that can help purify the air and are simple to care for:

  1. Bamboo Palm (Chamaedorea seifrizzi): Originates from Asia, boasting a potential height of up to 3 meters. Thriving in fertile soil and humid conditions, it serves as a natural purifier, adept at removing pollutants such as xylene, formaldehyde, and ammonia while combating dust effectively.

  2. Dracaena Trifasciata: Renowned for its tropical aesthetic and resilience, excels at purifying the air by effectively removing benzene, xylene, toluene, and formaldehyde.
  3. Peace Lily (Spathiphyllum): A popular indoor choice, it aids in purifying indoor air by targeting formaldehyde, xylene, toluene, carbon monoxide, and dust. It’s straightforward to cultivate, propagate, and it’s safe for pets, making it an ideal addition to any home. For optimal growth, position it in an area with indirect sunlight.
  4. Pothos: Readily available and low-maintenance, thrives with minimal attention. Watering is necessary only when the soil is dry. Notably, it efficiently absorbs formaldehyde, xylene, and benzene, contributing to improved air quality.
  5. Rubber Fig (Ficus elastica): is a resilient plant requiring minimal maintenance, but caution should be taken as it is toxic to pets. Beyond its air-purifying qualities, it also aids in maintaining humidity levels, making it a valuable addition to indoor spaces.
  6. Chrysanthemum: Despite cultural connotations in Italy, the chrysanthemum plant stands out as one of the most efficient indoor air purifiers. Capable of removing dust, benzene, toluene, and xylene, it demands placement in a well-lit area away from direct sunlight, along with regular watering. Caution should be exercised around pets, as it is toxic to them.

Are you prepared for an exhilarating and fulfilling journey? Cultivating ginger at home is not just pleasurable but also a fantastic way to boost your well-being. With its immune-enhancing qualities, anti-inflammatory effects, and digestion-aiding properties, ginger is an extraordinary spice that you can cultivate effortlessly. Follow this straightforward guide to commence your ginger-growing escapade and relish an endless reserve of this incredible spice.

Getting Started

To kick off, here’s what you’ll require:

  • Organic ginger root (avoid non-organic types treated with growth inhibitors)
  • A broad, shallow pot
  • Potting soil is abundant in organic matter

Follow these steps to prepare:

  • Selecting the right root: Pick a fresh and plump organic ginger root with visible “eyes” or small bumps from which the shoots will emerge.
  • Soaking the Root: Give your ginger root an overnight warm water bath to eliminate any residual inhibitors and activate the dormant buds.

Planting Your Ginger

Now that your ginger root is ready to sprout, it’s time to plant it in your chosen pot:

  • Fill the pot with organic, nutrient-rich potting soil, leaving a couple of inches at the top.
  • Place the ginger root horizontally in the soil, with the eyes facing upward.
  • Lightly cover the ginger root with an inch or two of soil, ensuring the eyes are not buried too deeply.
  • Water your ginger plant thoroughly, making sure the soil is moist but not saturated.

Caring for Your Ginger Plant

To ensure the thriving of your ginger plant, adhere to these key points:

  • Temperature: Maintain a consistent temperature range of 65-85°F (18-29°C).
  • Sunlight: Provide your ginger plant with indirect or filtered sunlight for approximately 6-8 hours a day.
  • Watering: Keep the soil consistently moist, watering your plant whenever the top inch feels dry. Avoid overwatering to prevent ginger roots from rotting in waterlogged conditions.
  • Fertilizing: Feed your ginger plant with a balanced organic fertilizer every two to three months to foster healthy growth.
  • Patience: Ginger is a slow-growing plant, so be patient and provide it with proper care and time to thrive.

Harvesting Your Ginger

After 8–10 months, your ginger will be ready to harvest. Here’s how:

  • Gently loosen the soil around the base of the plant.
  • Carefully lift the ginger plant out of the soil using a garden fork or your hands, being mindful not to damage the roots.
  • Select the mature rhizomes (underground stems) by cutting away what you need, and replant the remaining ginger for future growth.

Enjoying Your Homegrown Ginger

Now that you have successfully cultivated your own ginger, it’s time to relish the rewards of your efforts. Whether used in cooking, brewing tea, or crafting homemade remedies, the flavor, aroma, and health benefits of your homegrown ginger are yours to savor. Get imaginative, explore new recipes, and share the abundance with your loved ones!

So why wait? Embark on your ginger-growing adventure today and relish the joy of having a fresh supply of this remarkable spice right at your fingertips. Happy growing!

In the enchanting world of gardening, where each planted seed symbolizes a commitment to lush greenery and abundant harvests, unconventional methods often hold the key to unlocking extraordinary yields. While traditional approaches have been steadfastly relied upon, exploring the realm of unconventional gardening can bring unexpected advantages to your fruit and vegetable crops. Here are some innovative techniques capturing the attention of gardeners, promising fruitful outcomes for those open to venturing beyond the conventional.

Companion Planting: A time-tested strategy in gardening, companion planting involves strategically arranging certain plants to foster mutual benefits. Marigolds, for example, are esteemed companions for vegetables, known for their prowess in deterring pests such as nematodes. This natural pest control not only protects your crops but also establishes a harmonious ecosystem within your garden.

Mycorrhizal Fungi Inoculation: Unveiling the symbiotic relationship between plants and fungi, mycorrhizal fungi inoculation emerges as a transformative practice. By introducing these beneficial fungi into the soil, plants gain improved access to water and nutrients, nurturing robust growth and ultimately enhancing yields. It serves as a testament to the intricate web of connections thriving beneath the surface of our gardens.

Hügelkultur Beds: Embracing the ethos of sustainability, Hügelkultur beds provide a distinctive solution by repurposing organic waste. Through the strategic layering of decomposing wood and compostable materials, these elevated beds create fertile grounds for plants, ensuring a continuous supply of nutrients as the wood breaks down. The outcome? Luxuriant vegetation, enhanced soil quality, and abundant harvests, all nurtured by the cyclical forces of nature.

Moon Phase Gardening: Adding a celestial dimension to your gardening pursuits, moon phase gardening involves aligning planting schedules with the waxing and waning of the moon. Advocates of this approach believe that by syncing activities with lunar cycles, crop yields can be maximized. Whether attributed to the gravitational pull of the moon or a cosmic harmony, the tangible results manifest in the flourishing abundance of the garden.

Aquaponics and Hydroponics: Pioneering innovation, aquaponics and hydroponics redefine conventional gardening by eliminating the need for soil altogether. Cultivating plants in nutrient-enriched water, these systems offer unmatched efficiency and productivity. In a world where space is a premium and resources are scarce, these methods stand as pillars of sustainable agriculture, signaling a future of attainable abundance.

Bokashi Composting: Converting kitchen scraps into a valuable resource, bokashi composting harnesses the power of beneficial microbes. Through fermentation, organic waste swiftly transforms into a nutrient-rich soil amendment, infusing the earth with vitality. As these microbes work their transformative magic, gardens thrive with renewed energy, producing a diverse array of fresh, healthy produce.

Mulching with Wood Chips or Straw: Acting as a protective layer for the soil, mulching with wood chips or straw imparts numerous benefits to the garden. Beyond conserving moisture and suppressing weeds, it also enriches the soil as it decomposes, creating optimal conditions for plant growth. This straightforward yet impactful practice reaps abundant rewards with each passing season.

Biochar: Tapping into the transformative potential of fire, biochar stands as a formidable ally in enriching soil fertility. When integrated into the earth, this charcoal-like substance opens the door to a myriad of advantages, ranging from improved water retention to heightened nutrient absorption. With each application, the garden evolves into a thriving oasis, pulsating with life, vitality, and abundance.

Intercropping and Polyculture: Embracing the beauty of diversity, intercropping and polyculture mirror the intricate patterns found in natural ecosystems. Through the cultivation of diverse crops in close proximity, gardeners orchestrate a harmonious balance that deters pests, fosters pollination, and optimizes the utilization of available space. It’s a symphony of biodiversity where each plant contributes to the grand arrangement of the garden.

Vermicomposting: Delegating composting duties to nature’s diligent laborers, vermicomposting marks a revolutionary shift in waste management. With the assistance of earthworms, organic waste undergoes a metamorphosis into nutrient-rich vermicompost, enriching the soil and fortifying plants against adversities. As these unassuming creatures diligently work beneath the surface, the garden thrives with abundance, exemplifying the power of cooperation within nature’s grand design.

Although these unconventional gardening techniques offer substantial potential for increasing yields, it’s crucial to acknowledge that outcomes may differ based on factors like climate, soil composition, and plant varieties. The key lies in experimentation and adaptation as you set out on your quest to nurture a flourishing garden. So, don your gardening gloves, welcome the unconventional approaches, and witness your garden blossom with renewed vitality and abundance.


Urban Agriculture: Cultivating Garlic from Scratch Using a Basic Plastic Bottle In the urban landscape, residents are exploring inventive ways to connect with agriculture, leading to a surge in urban farming practices. A straightforward plastic bottle can serve as the inception of your upcoming gardening project. Garlic, renowned for both its medicinal attributes and flavor-enhancing qualities, proves to be an excellent option for such initiatives. Let’s explore the steps to initiate garlic cultivation in a plastic bottle before transferring it to a more natural growing medium.

Crucial Elements for the Procedure Before commencing this gardening endeavor, ensure you have the following essentials:

  1. Garlic Bulbs: Opt for organic garlic bulbs, preferably from local vendors or organic stores to avoid potential chemical constraints on growth.
  2. Transparent Plastic Container: A thoroughly cleaned, clear soda or mineral water bottle is ideal for this purpose.
  3. Water: Use chlorine-free water; if tap water is your source, allow it to stand for a day to let the chlorine dissipate.
  4. High-Quality Soil: Once the garlic exhibits signs of growth, prepare nutrient-rich soil for the transplantation phase.
  5. Planting Container: This could be a pot or a designated area in your urban garden where the garlic can seamlessly continue its growth journey.

Essentials for the Process

Step 1: Bottle Preparation Trim the upper part of the plastic bottle, leaving approximately two-thirds for the garlic cloves. Ensure the container is clean, free from blemishes or cracks.

Step 2: Garlic Selection and Preparation Choose robust, sizable garlic cloves, removing the outer skin while preserving the core clove.

Step 3: Clove Placement Position the garlic cloves in the bottle with their flat bases pointing downward, allowing space for expansion.

Step 4: Hydration Pour water into the bottle, submerging the bottom part of the cloves while keeping the upper section dry to prevent decay.

Step 5: Placement in Sunlight Position the bottle in a location with ample sunlight, crucial for optimal garlic growth.

Step 6: Daily Maintenance Check water levels daily, ensuring roots remain submerged. Refresh the water every 48 hours to prevent harmful microorganisms.

Step 7: Growth Observation Within about seven days, green sprouts and expanding root strands will indicate successful garlic initiation.

Transplanting Garlic Roots into Soil

Step 8: Soil Preparation After observing garlic sprouts in the bottle, prepare a garden bed or pot with nutrient-rich, well-draining potting soil.

Step 9: Careful Root Relocation With utmost care, remove garlic cloves from the bottle, avoiding harm to fragile roots. Bury them in soil, ensuring sprouted shoots are visible.

Step 10: Post-Relocation Care Immediately saturate the soil after relocating the garlic. Monitor moisture levels to keep the soil damp but not waterlogged. Place the pot or garden spot in a sunny location.

Harvesting Time Patience pays off when the majority of garlic leaves turn rustic brown, typically occurring in 7-8 months, with variations based on garlic type and nurturing conditions.

Utilizing discarded plastic bottles for the initial phase of garlic cultivation not only represents an environmentally conscious choice but also showcases a creative approach to gardening. These practices underscore the significance of recycling while facilitating a seamless transition for garlic from the bottle to the soil. Delve into the world of gardening, where even small initiatives can yield abundant and aromatic results.

Cultivating strawberries at home is a delightful endeavor appreciated by many garden enthusiasts. With their vibrant red color, sweet taste, and versatility, strawberries stand out as a favorite fruit for home growers. If space is limited or if you’re seeking a unique method for cultivating these luscious berries, consider the ingenious and eco-friendly solution of growing them in 5L plastic bottles. This article guides you through the steps to achieve abundant strawberry production using these compact containers.

Container Gardening Essentials

  1. Container Selection: Repurpose 5-liter plastic bottles, often discarded as waste, to create a thriving strawberry garden. Cut off the tops, leaving the bottom section as a self-contained growing environment.
  2. Soil Preparation: Create an ideal growing environment by filling the bottles with a well-draining mix of potting soil and compost in equal proportions. Ensure the mixture is light and fluffy to allow the roots to breathe.
  3. Strawberry Varieties: Choose from three main types of strawberries – June-bearing, everbearing, and day-neutral. For continuous production, consider everbearing or day-neutral varieties. The compact size of Alpine strawberries makes them a great fit for container gardening.
  4. Planting Technique: Plant strawberry runners or young plants in the bottles, ensuring the crown sits just above the soil surface. Space them 8-10 inches apart for proper growth.
  5. Sunlight: Position the containers in a sunny spot, providing at least 6-8 hours of daily sunlight. Full sun exposure is crucial for flowering and fruit production.
  6. Watering Routine: Maintain consistent soil moisture, avoiding waterlogging. Containers dry out quickly, so regular watering, especially during hot weather, is essential.
  7. Fertilization: Strawberries are heavy feeders. Apply a balanced, slow-release fertilizer every 4-6 weeks during the growing season to ensure abundant fruit production.
  8. Pest and Disease Management: Monitor for common strawberry pests and diseases like aphids, slugs, and gray mold. Regular inspection and organic pest control methods will safeguard your strawberry crop.
  9. Pruning and Runner Control: Trim excess runners to encourage vigorous growth and increase strawberry production. This directs the plant’s energy towards fruit development for a healthier harvest.

By following these steps and caring for your strawberry plants, you’ll soon enjoy a bountiful harvest of delicious, homegrown strawberries from your 5L plastic bottle containers. This cost-effective and space-saving solution brings the joy of fresh strawberries to your home, regardless of limited gardening space. Happy gardening!

FUN FACT

Explore the fascinating phenomenon of vivipary, where certain fruit seeds, including strawberries, germinate inside the fruit while still attached to the parent plant. This unique process contributes to the rapid propagation of strawberries, showcasing their remarkable adaptability and prolific reproductive abilities.