
If you’re looking for a natural way to boost your health, the powerful combination of cayenne pepper, olive oil, and lemon juice is your answer. These three ingredients have long been celebrated for their individual health benefits, but when combined, they create a dynamic trio that can enhance digestion, support cardiovascular health, improve skin, and much more. Let’s dive into why these three simple ingredients are a must-have for your daily wellness routine.
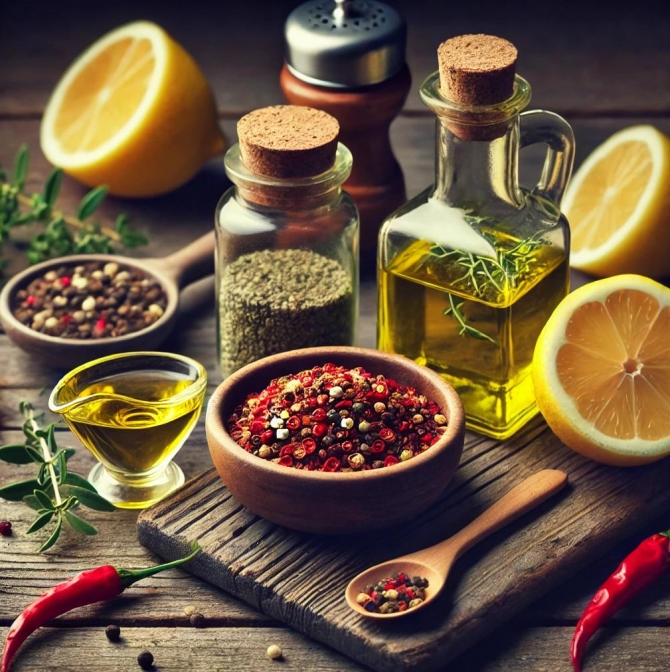
Cayenne Pepper: The Metabolism-Boosting Hero
Cayenne pepper is not just a flavorful spice—it’s a potent health booster. The active compound in cayenne pepper, capsaicin, is known to have a wide array of health benefits. It’s renowned for its ability to stimulate metabolism, helping the body burn calories more efficiently. Capsaicin also enhances circulation, which is beneficial for overall heart health. Additionally, cayenne pepper is known for its ability to support digestion by stimulating the production of digestive enzymes, making it an ideal addition to any diet focused on improving gut health.
Olive Oil: The Heart-Healthy Fat
Olive oil is often referred to as one of the healthiest fats available, thanks to its rich content of monounsaturated fats. These fats are known to help lower bad cholesterol levels, promoting a healthier heart. Olive oil is also packed with antioxidants, which help fight inflammation throughout the body. Chronic inflammation can lead to various diseases, including heart disease, so incorporating olive oil into your diet is a great way to reduce the risk of inflammation-related conditions. Additionally, olive oil supports healthy brain function and has been shown to help improve skin health, making it a versatile and essential ingredient for overall well-being.
Lemon Juice: The Immune-Boosting Citrus
Lemon juice is a powerhouse when it comes to boosting your immune system. Rich in vitamin C, it helps strengthen your body’s defense mechanisms, making it an excellent way to fend off common illnesses like colds and flu. The high vitamin C content also helps in the production of collagen, which is essential for skin health, promoting a youthful glow and reducing wrinkles. Moreover, lemon juice has natural detoxifying properties, helping the liver process toxins more efficiently. Its acidity aids digestion, ensuring your body absorbs nutrients more effectively while keeping your gut in check.
How These Three Work Together

When combined, cayenne pepper, olive oil, and lemon juice form a potent natural remedy that can support various aspects of your health. Their synergistic effect enhances digestion, boosts metabolism, promotes heart health, and supports the immune system, offering an all-around health boost. Let’s explore how these ingredients can be used together in your daily routine.
1. Morning Detox Tonic: Kickstart Your Day
One of the simplest and most effective ways to incorporate this trio into your routine is by making a morning detox tonic. This drink is incredibly easy to make and can provide a powerful health boost first thing in the morning. To make your detox tonic, mix a pinch of cayenne pepper, one tablespoon of olive oil, and the juice of half a lemon in a glass of warm water. Drink it on an empty stomach to kickstart your metabolism, improve digestion, and provide a natural energy boost. This simple routine helps flush out toxins and supports liver function, setting a healthy tone for the rest of your day.
2. Flavorful Salad Dressing: A Healthful Addition to Your Meals
Another great way to incorporate these ingredients into your daily meals is by making a flavorful salad dressing. Combine olive oil, a squeeze of lemon juice, and a pinch of cayenne pepper with your favorite herbs, such as basil or oregano, for a zesty and nutritious dressing. This dressing not only adds a burst of flavor to your salads but also provides all the health benefits associated with cayenne pepper, olive oil, and lemon juice in a convenient form. You can also add a bit of honey for a touch of sweetness if you prefer a more balanced taste.
3. Energy-Boosting Veggie Drizzle: Enhance Your Dishes
For an extra energy boost, add a dash of cayenne pepper and a squeeze of lemon juice to olive oil, and drizzle it over grilled vegetables or whole grains. The spicy kick from the cayenne pepper pairs perfectly with the bright, tangy flavor of lemon juice, while the olive oil adds richness and depth. This simple drizzle can transform any dish, making it both flavorful and nourishing.
Precautions and Considerations
While this combination offers impressive health benefits, it’s important to start with small amounts, particularly if you have a sensitive stomach. Cayenne pepper, for example, may irritate the stomach lining for some people, so it’s best to monitor how your body reacts. Additionally, cayenne pepper may interact with certain medications, particularly blood thinners, so it’s always advisable to consult a healthcare provider if you have concerns or are on medication.
If you’re pregnant or breastfeeding, it’s best to limit your intake of cayenne pepper and consult with your doctor before using this remedy regularly. For those with gastrointestinal issues such as acid reflux, lemon juice may exacerbate symptoms, so it should be used cautiously or avoided.
Final Thoughts
By combining cayenne pepper, olive oil, and lemon juice, you create a natural remedy that supports overall health and wellness. These ingredients work together to enhance digestion, boost metabolism, promote heart health, and strengthen the immune system. Not only do they help improve your physical health, but they also add a burst of flavor to your meals and drinks.
Incorporating this simple yet effective trio into your daily routine can help you feel more energized, support your digestive health, and protect your body from illness. Whether you enjoy it in a detox tonic, as a salad dressing, or over grilled vegetables, the benefits are clear. Start using these natural ingredients today and unlock a healthier, more vibrant you.


")