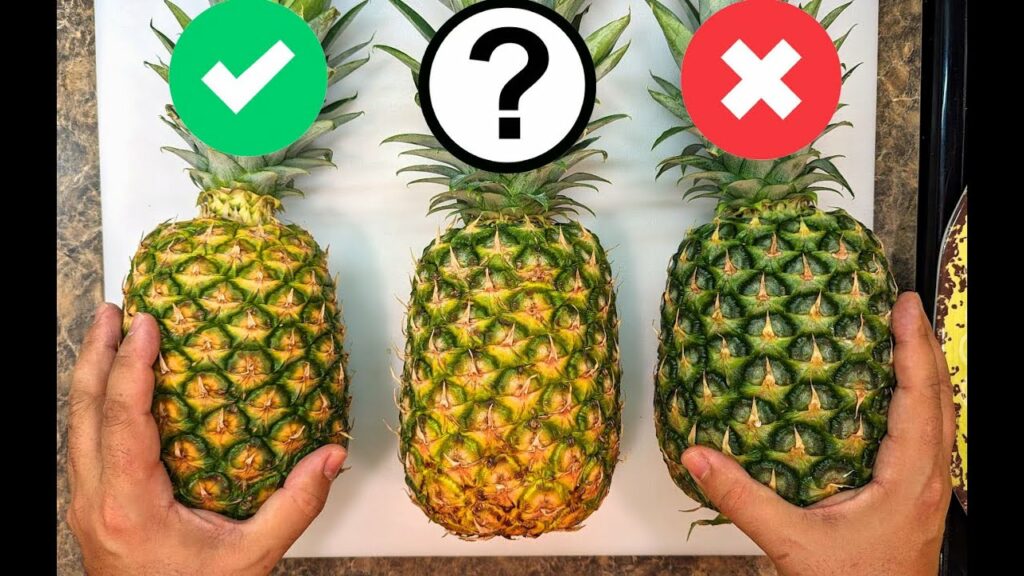
Euphorbia, also known as Spurge, is an extraordinary plant family that encompasses a wide variety of species. From small, delicate plants to towering trees, Euphorbia offers a diverse range of options for any garden. What sets Euphorbia apart is its remarkable adaptability, thriving in both arid deserts and lush tropical climates. It’s a testament to the incredible resilience and beauty of nature.
The Healing Powers of Euphorbia
For centuries, cultures around the world have recognized the medicinal properties of Euphorbia. This versatile plant has been used to treat a multitude of ailments, ranging from skin conditions to digestive problems. However, it’s important to approach Euphorbia with caution and knowledge. The sap of this plant contains potent compounds that can cause irritation if mishandled. Always seek guidance from healthcare professionals or knowledgeable herbalists before using Euphorbia for medicinal purposes.
Adding Euphorbia to Your Garden
If you’re looking to enhance your garden’s beauty and spark interesting conversations, Euphorbia is an excellent choice. This plant thrives in sunlight and well-draining soil, making it relatively low-maintenance. By incorporating Euphorbia into your green space, you’ll not only enjoy its captivating visual appeal but also provide a habitat for unique wildlife.
Euphorbia: A Celebration of Nature’s Diversity
As you delve into the captivating world of Euphorbia, remember that this plant represents more than just physical beauty or its healing potential. It symbolizes the incredible diversity and adaptability found in nature. Whether you’re admiring its striking form in your garden or exploring its historical uses, Euphorbia is sure to deepen your appreciation for our natural world.
So, let us celebrate the wonders of Euphorbia, a plant that holds not only a special place in our gardens but also in our heritage and the remarkable tapestry of nature’s marvels. Cheers to the healing secrets and awe-inspiring beauty of this incredible plant!
If you’re looking for a refreshing and invigorating drink, Watermelon Ginger and Lime Juice is the answer! This delightful beverage combines the sweet juiciness of watermelon with the zesty kick of ginger and the tangy brightness of lime. Whether it’s a hot summer day or you simply want a revitalizing treat, this juice is not only delicious but also packed with health benefits. Let’s get started!
Hydrating and Refreshing: With over 90% water content, watermelon is incredibly hydrating and perfect for staying cool and refreshed.
Health Boost: Ginger adds a spicy kick and is known for its anti-inflammatory and digestive benefits. Lime provides a boost of vitamin C and adds a tangy flavor that perfectly balances the sweetness of the watermelon.
Easy to Make: With just a few simple ingredients, you can whip up this tasty juice in no time.
4 cups of cubed watermelon (seeds removed)
1-2 inches of fresh ginger, peeled and grated
Juice of 2 limes
Ice cubes (optional)
Fresh mint leaves (optional) for garnish
Prepare the Ingredients: Start by cubing the watermelon and removing any seeds. Peel and grate the ginger, and juice the limes.
Blend the Watermelon: Place the watermelon cubes in a blender and blend until smooth. If your blender has a juicing setting, use that to get a smoother consistency.
Add Ginger and Lime: Add the grated ginger and lime juice to the blender. Blend again until all ingredients are well combined.
Strain the Juice: For a smoother juice, you can strain the mixture through a fine-mesh sieve or cheesecloth into a pitcher. Press down on the pulp to extract as much juice as possible.
Serve: Pour the juice into glasses over ice cubes if desired. Garnish with fresh mint leaves for an extra touch of freshness.
Sweetness: If you prefer a sweeter drink, you can add a tablespoon of honey or agave syrup.
Spice Level: Adjust the amount of ginger to suit your taste. For a milder flavor, use less ginger; for a stronger kick, add more.
Chill Time: For an even more refreshing drink, chill the watermelon in the refrigerator before blending.
Hydration: Perfect for staying hydrated, especially on hot days.
Digestive Aid: Ginger helps with digestion and can relieve nausea.
Immune Boost: Lime provides vitamin C, supporting your immune system.
Watermelon Ginger and Lime Juice is a fantastic way to stay cool, hydrated, and healthy. With its blend of sweet, tangy, and spicy flavors, it’s a delightful drink that’s easy to make and packed with benefits. Give this recipe a try and enjoy the refreshing taste of summer in a glass. Cheers to your health and happiness!
Do you ever find yourself using the same roll of toilet paper in both the kitchen and the bathroom? Well, it turns out there’s a nifty trick that can make this possible – storing toilet paper in the refrigerator! I know it might sound a little strange, but trust me, it has its benefits.
One of the advantages of putting toilet paper in the fridge is that it can help keep bad odors at bay. Did you know that the cellulose in toilet paper has an absorption ability that can eliminate unpleasant odors created by food? Simply place a roll on a refrigerator shelf and let it work its magic. The toilet paper will soak up any unwanted odors, leaving your fridge smelling fresh and clean.
Not only does storing toilet paper in the fridge help with odor control, but it can also have a surprising effect on your fruits and vegetables. By trapping water molecules that land on your produce, the toilet paper can help them retain more of their natural water content. This means your fruits and veggies will stay fresher for longer. It’s like having a mini moisture absorber in your fridge!
If you decide to give this trick a try, make sure to replace the toilet paper as soon as it becomes wet for the best results. And remember, you can also keep a couple of rolls in the pantry to maximize the benefits.
But wait, there’s more! If you’re looking for more ways to get rid of unpleasant smells in your fridge, here are a few all-natural solutions:
Regularly wipe out the fridge with white vinegar. Vinegar is known for its odor-absorbing properties and can help eliminate any lingering smells.
Keep the freezer clean. Regularly cleaning out the freezer and removing any old or expired food can go a long way in preventing unpleasant odors.
So, next time you’re faced with a smelly fridge or find yourself using toilet paper in both the kitchen and the bathroom, remember this handy trick – put toilet paper in the fridge! It’s a simple solution that can make a big difference in your daily life.
Are you searching for a tasty beverage that will not only satisfy your taste buds but also provide numerous health benefits? Look no further than watermelon juice with ginger! This delightful combination is not only delicious but also offers a host of benefits that can boost your overall well-being. Let’s explore how to make this refreshing juice and discover the amazing advantages it brings.
Why Choose Watermelon and Ginger?
Watermelon is a hydrating fruit that is packed with essential vitamins such as A, B6, and C. It is also rich in antioxidants and amino acids. With its low calorie content and high water content, watermelon is the perfect choice for hydration and detoxification.
Ginger, on the other hand, is a powerful root known for its anti-inflammatory and antioxidant properties. It aids in digestion, reduces nausea, and has even been shown to boost the immune system.
Ingredients You’ll Need
To create this revitalizing juice, gather the following ingredients:
4 cups of cubed watermelon (seeds removed)
1-inch piece of fresh ginger (grated)
1 tablespoon of honey (optional, for added sweetness)
Juice of 1 lime (optional, for a tangy twist)
Ice cubes (optional, for serving)
How to Prepare Watermelon Ginger Juice
Follow these simple steps to prepare this delicious and healthy juice:
Prepare the Watermelon: Begin by cutting the watermelon into small cubes and removing any seeds. Aim to have approximately 4 cups of watermelon cubes.
Grate the Ginger: Peel a 1-inch piece of fresh ginger and finely grate it. Grating the ginger will ensure it blends smoothly into the juice.
Blend the Ingredients: In a blender, combine the watermelon cubes, grated ginger, and any optional honey or lime juice.
Blend until Smooth: Blend the mixture on high speed until it becomes smooth and well combined.
Strain (Optional): If you prefer a smoother texture, strain the juice through a fine mesh sieve or cheesecloth to remove any pulp. This step is optional and depends on your personal preference.
Serve and Enjoy: Pour the juice into glasses and, if desired, add ice cubes for an extra refreshing touch. It is best to serve the juice immediately for the optimal flavor and freshness.
The Power of Watermelon Ginger Juice
Sip on this delicious concoction and enjoy the numerous benefits it offers:
Hydration: With watermelon as its main ingredient, this juice is an excellent way to stay hydrated, especially on hot days. Watermelon is composed of over 90% water, making it a refreshing choice.
Digestive Health: Thanks to the inclusion of ginger, this juice helps stimulate digestion and can alleviate nausea. It is the perfect remedy for soothing an upset stomach.
Anti-Inflammatory: Both watermelon and ginger contain anti-inflammatory properties that promote overall health and can help reduce inflammation in the body.
Immune Boost: The vitamins and antioxidants in watermelon, combined with the immune-boosting properties of ginger, make this juice a powerful ally in maintaining a strong immune system.
Low in Calories: With its nutrient-rich composition and low calorie count, this juice is an ideal option for those looking to manage their weight while still enjoying a tasty beverage.
Additional Tips
Experiment with Flavors: Feel free to get creative by adding other fruits like strawberries or mint leaves to the blend for a different flavor profile.
Storage: While freshly made juice is best consumed immediately, you can store it in the refrigerator for up to 24 hours to enjoy later.
By incorporating watermelon ginger juice into your routine, you can enjoy a tasty, refreshing drink that also supports your health. Give this easy recipe a try and experience the revitalizing benefits for yourself! Cheers to your health!
Do you want to give your plants some extra TLC without spending a fortune? Look no further! Creating homemade fertilizers is a fantastic way to nourish your plants, using everyday items found right in your own home. Not only is it cost-effective, but it’s also environmentally friendly. Let’s explore two simple and effective options that you can start using today!
1. Banana Peels: A Potassium Powerhouse
Why Banana Peels? Banana peels might seem like waste, but they are actually packed with potassium – an essential nutrient for your plants. Potassium helps strengthen plant roots, promotes flowering, and improves overall plant health.
How to Use:
Bury the Peels: Chop banana peels into small pieces and bury them in the soil around your plants. As they decompose, they will release potassium and other nutrients into the soil, giving your plants the boost they need.
Soak for Liquid Fertilizer: Soak banana peels in water for 24-48 hours. Use the resulting liquid to water your plants. This method quickly delivers nutrients directly to the roots, giving your plants a nutrient-rich drink.
2. Coffee Grounds: Perfect for Acid-Loving Plants
Why Coffee Grounds? Do you love your morning cup of joe? Well, your plants will love it too! Coffee grounds are slightly acidic and rich in nitrogen, making them perfect for acid-loving plants like azaleas, blueberries, and roses.
How to Use:
Direct Application: Sprinkle used coffee grounds around the base of your acid-loving plants. This method helps improve soil structure and adds organic matter, which will make your plants thrive.
Composting: Add coffee grounds to your compost pile. They contribute nitrogen, which helps speed up the decomposition process and enriches the compost. It’s a win-win situation for your plants and the environment!
More Homemade Fertilizer Options
If you’re feeling adventurous or want to try something different, here are some other homemade fertilizer options that can give your plants the nutrients they crave:
Eggshells: Crush and sprinkle around plants for a calcium boost.
Epsom Salt: Dissolve in water for magnesium, which helps with photosynthesis.
Molasses: Dilute in water to feed beneficial soil microbes.
Aquarium Water: Use as a nutrient-rich watering solution.
Wood Ash: Sprinkle for potassium and calcium.
Gelatin: Dissolve in water for nitrogen, promoting leafy growth.
Milk: Mix with water for calcium and protein.
Seaweed: Rinse and chop for a mineral-rich boost.
Vegetable Scraps: Boil and use the broth as a nutrient-rich fertilizer.
Weed Tea: Steep weeds in water to create a nutrient-rich fertilizer.
Experiment and Nourish
Now that you have a variety of homemade fertilizer options, it’s time to get your hands dirty and experiment! Find out what works best for your plants by combining different types, providing them with a balanced nutrient profile. This will ensure robust and healthy plant growth, making your garden a sight to behold. Happy gardening and happy nourishing!
Do you love garlic as much as we do? If so, we have a great tip to share with you – a simple method to keep your garlic fresh and flavorful for a whole year! This technique not only preserves the garlic, but it also boosts its natural antibiotic properties, making it a powerful health booster. Let us show you how you can easily keep your garlic intact and potent with this tried-and-true recipe.
Fresh Garlic: 2 kilos, peeled and cleaned
Apple or Grape Cider Vinegar: 1.5 cups (300 ml), for preservation
Coarse Rock Salt: 1.5 tablespoons, essential for freshness
Lemon Salt: 1 teaspoon, for added flavor and preservation
Lemon Slices: 4 thin slices, providing vitamin C and freshness
Bay Leaves: 2, adding flavor and antibacterial properties
Drinking Water: Enough to fill the jars
Prepare the Garlic
Start by peeling 2 kilos of fresh garlic. It may take some time, but trust us, it’s worth it! The peeling process is important for the best preservation. Fresh garlic contains allicin, a compound known for its strong antibiotic properties.
Sterilize the Jars
To ensure the jars are clean and ready to use, thoroughly sterilize them. You can either boil the jars in water for a few minutes or run them through a hot cycle in the dishwasher. It’s important to keep everything clean to preserve the garlic effectively.
Fill the Jars
Divide the peeled garlic cloves evenly among the sterilized jars. For some extra flavor and health benefits, add a couple of thin lemon slices and one bay leaf to each jar. These ingredients will enhance the taste and provide additional nutritional value.
Prepare the Brine
In a saucepan, mix 1.5 cups of apple or grape cider vinegar, 1.5 tablespoons of coarse rock salt, and 1 teaspoon of lemon salt. Bring this mixture to a gentle boil, making sure the salts dissolve completely. This brine will help preserve the garlic and add flavor.
Add the Brine and Water
Pour the hot vinegar mixture into the jars, ensuring that the garlic and lemon slices are fully covered. Fill the rest of each jar with drinking water, leaving about an inch of space at the top. This space allows for a vacuum seal when the jars are closed, keeping the garlic fresh.
Seal and Store
Seal the jars tightly and store them in a cool, dark place. Let the garlic ferment for at least two weeks before using it. The fermentation process enhances the garlic’s flavors and preservative qualities. Remember, patience is key for the best results!
Natural Antibiotic: Garlic’s allicin fights infections and boosts immunity.
Long-Lasting Freshness: This method keeps garlic fresh and flavorful for up to a year.
Nutrient-Rich: The preserved garlic is rich in vitamins and minerals, including those from the lemon slices.
Use Fresh Ingredients: Fresh, high-quality garlic and organic vinegar yield the best results.
Patience Pays Off: Allow the garlic to properly ferment to maximize its health benefits and flavor.
By following this simple recipe, you can enjoy fresh and potent garlic all year round. This method not only preserves the garlic’s natural antibiotic properties, but it also enhances its flavor, making it a wonderful addition to your meals. Try it out today and keep your garlic stash fresh and ready to use anytime!
As we get ready for the summer season, it’s time to savor the ripe and sweet flavor of strawberries. And what better way to enjoy them throughout the year than by making your own homemade canned strawberries? This recipe allows you to preserve the freshness of strawberries in a simple syrup, perfect for adding to desserts, breakfast dishes, or even enjoying straight from the jar.
The Benefits of Canning Strawberries
Sustainable Solution: By canning strawberries, we can contribute to reducing food waste, making it an environmentally friendly choice that we can feel good about.
Nutritional Goodness: Strawberries are not only delicious but also a great source of vitamins B and C. Plus, they are packed with fiber, making them a nutritious addition to any meal.
Endless Possibilities: When you can your own strawberries, you have the freedom to flavor them in various ways, allowing you to customize their taste to your preference. The possibilities are truly endless!
Recipe: Homemade Canned Strawberries
Ingredients:
5 pounds of fresh, ripe strawberries
4 cups of water
4 cups of granulated sugar
2 tablespoons of lemon juice
Directions:
Begin by sterilizing your canning jars and lids following the standard canning procedures.
Rinse the strawberries under cold water and remove the stems.
In a large pot, create a simple syrup by combining the water and sugar. Heat the mixture over medium heat, stirring until the sugar completely dissolves.
Add the strawberries and lemon juice to the pot and bring to a gentle boil. Let the mixture simmer for about 5 minutes until the strawberries slightly soften.
Carefully ladle the hot strawberries and syrup into the sterilized jars, leaving about a 1/2 inch of headspace at the top.
Remove any air bubbles by running a knife or a bubble remover tool along the inside edge of the jars.
Wipe the jar rims with a clean, damp cloth to ensure a proper seal. Place the lids on the jars and screw on the bands until fingertip tight.
Process the jars in a boiling water bath for 15 minutes. Adjust the processing time according to your altitude if needed.
Once done, remove the jars from the water bath and let them cool on a towel or a cooling rack. Remember to check the seals after 24 hours. A properly sealed lid should not flex up and down when pressed.
Store the sealed jars in a cool, dark place for up to one year. Refrigerate any jars that did not seal properly and use them within a few weeks.
Strawberry Selection: Choose ripe and unblemished strawberries for the best flavor and quality. The sweeter the strawberries, the better the end result!
Adjusting the Sweetness: Don’t be afraid to play around with the amount of sugar in the syrup to suit your taste buds. Feel free to experiment with alternative sweeteners as well.
Handling and Sealing the Jars: Be gentle when handling the jars to prevent breakage. And make sure to seal them properly for the best results.
Homemade canned strawberries offer a delightful way to preserve the essence of summer and enjoy the sweet taste of strawberries all year long. Whether you’re using them to top a bowl of ice cream, make a delicious pie, or simply enjoying them straight from the jar, canned strawberries are a fantastic addition to your pantry. So why not indulge in this timeless tradition and add a touch of summer to your meals every day? Start canning your own strawberries today and discover the joy of homemade goodness!
Maintaining good eye health is crucial, especially as we age. Fortunately, there is a delicious and natural way to protect our vision: blueberries. These tiny berries are packed with nutrients that can work wonders for our eyes. In this article, we will explore why blueberries are the number one recommendation for eye health and discover easy ways to incorporate them into our diet.
1. Rich in Antioxidants
Blueberries are bursting with antioxidants, including vitamin C, vitamin E, and anthocyanins. These powerful compounds shield our eyes from oxidative stress and harmful free radicals, which can cause damage over time. By enjoying blueberries regularly, we can give our eyes the protection they need to stay healthy.
2. Anti-Inflammatory Properties
Chronic inflammation can contribute to eye diseases such as cataracts and glaucoma. Luckily, blueberries possess anti-inflammatory properties that help reduce inflammation and safeguard our eyes. By adding blueberries to our diet, we can actively combat this risk and promote long-term eye health.
3. Improves Circulation
Blueberries contain essential nutrients that improve blood circulation to the eyes. This improved circulation ensures that our eyes receive the necessary oxygen and nutrients for optimal function. By including blueberries in our diet, we can support our eye health and keep our vision sharp.
4. Protects Against UV Damage
Regular consumption of blueberries can also provide protection against harmful UV rays, reducing the risk of developing cataracts. By enjoying these delicious berries, we can shield our eyes from potential damage caused by the sun.
Blueberries are a nutrient powerhouse, offering various essential vitamins and minerals to support eye health:
Vitamin C: Helps protect the eyes from oxidative damage.
Vitamin E: Prevents free radical damage in eye cells.
Anthocyanins: Improve night vision and reduce eye fatigue.
Zinc: Essential for maintaining the health of the retina.
Adding blueberries to your daily routine is simple and enjoyable. Here are some ideas to get you started:
1. Breakfast Boost
Start your day on a nutritious note by adding a handful of fresh or frozen blueberries to your morning cereal, oatmeal, or yogurt. Blueberries not only enhance the flavor but also provide a healthy start to your day.
2. Smoothies
Blend blueberries into your favorite smoothies. Combine them with other fruits like bananas, strawberries, and a splash of almond milk for a delicious and eye-friendly drink.
3. Snacks
Enjoy blueberries as a convenient snack on their own or mix them with nuts and seeds for a nutritious trail mix. This snack is not only tasty but also beneficial for your eye health.
4. Salads
Add a burst of sweetness to your salads by tossing in some blueberries. They pair well with spinach, feta cheese, and walnuts, creating a delightful and eye-nourishing combination.
5. Desserts
Indulge your sweet tooth by using blueberries in desserts like muffins, pies, and parfaits. Opt for recipes that use minimal sugar to retain the health benefits of blueberries.
Here are some additional tips to remember when it comes to blueberries:
Fresh or Frozen: Both fresh and frozen blueberries are equally nutritious. Keep a bag of frozen blueberries on hand to enjoy them year-round.
Daily Intake: Aim to include at least a half-cup of blueberries in your daily diet to maximize their eye health benefits.
Storage: Store fresh blueberries in the refrigerator and consume them within a week to maintain their freshness and nutritional value.
Blueberries are a true superfood for our eyes. With their rich antioxidants, anti-inflammatory properties, and ability to improve circulation, blueberries are a must-have for anyone looking to safeguard their vision. By incorporating these delicious berries into our daily diet, we can enjoy their numerous health benefits while savoring their delightful taste. Here’s to your eye health and a brighter future!
Carrot juice is more than just a delicious and refreshing drink—it’s packed with essential nutrients that can greatly improve your overall health. Rich in vitamins, antioxidants, and fiber, carrot juice offers numerous benefits for your eyes, skin, digestion, and even your immune system. Let’s explore the remarkable benefits of carrot juice and why it’s a great addition to your daily routine!
1. Improves Eye Health
Carrot juice is famously known for its ability to boost eye health. Carrots are rich in beta-carotene, which the body converts into vitamin A, an essential nutrient for maintaining healthy vision. Vitamin A helps protect the surface of the eye (cornea) and prevents night blindness and age-related macular degeneration.
How it helps: Regular consumption of carrot juice can reduce the risk of developing eye disorders and improve night vision.
2. Boosts Immunity
Carrot juice is an excellent source of vitamins A, C, and antioxidants, all of which play a key role in boosting the immune system. Vitamin C, in particular, supports the production of white blood cells, which are crucial for fighting off infections and illnesses.
How it helps: Drinking carrot juice regularly can help strengthen your immune system and protect your body from colds, flu, and infections.
3. Promotes Healthy Skin
Thanks to its high content of beta-carotene, antioxidants, and vitamin C, carrot juice is a powerful natural remedy for improving skin health. These nutrients help repair skin tissues, reduce inflammation, and promote a youthful glow by protecting the skin from damage caused by free radicals and UV rays.
How it helps: Carrot juice helps reduce acne, improves skin texture, and slows down the aging process by promoting collagen production.
4. Supports Heart Health
Carrot juice is rich in potassium, which is essential for maintaining healthy blood pressure levels. Potassium helps relax blood vessels and prevent hypertension, reducing the risk of heart disease. Additionally, the antioxidants in carrot juice help reduce oxidative stress, which can lead to heart issues.
How it helps: Drinking carrot juice can improve cardiovascular health by reducing blood pressure and cholesterol levels, promoting better heart function.
5. Aids in Weight Loss
Carrot juice is low in calories and packed with fiber, making it an excellent addition to a weight loss diet. The fiber in carrot juice helps promote feelings of fullness, reducing overeating and snacking between meals. The nutrients in carrots also help boost metabolism.
How it helps: Drinking carrot juice can support weight loss efforts by reducing hunger and promoting fat metabolism.
6. Enhances Digestive Health
Carrot juice is great for the digestive system. It contains fiber, which supports healthy digestion and helps prevent constipation. Additionally, the antioxidants in carrot juice aid in detoxifying the digestive tract, promoting smoother digestion.
How it helps: Regular consumption of carrot juice improves bowel movements and helps detoxify the body, leading to better digestion.
7. Strengthens Bones
Carrot juice is a good source of vitamin K and calcium, both of which are essential for maintaining strong and healthy bones. These nutrients help improve bone density and prevent conditions like osteoporosis, especially in older adults.
How it helps: Drinking carrot juice regularly can help maintain bone health and reduce the risk of fractures and bone-related conditions.
8. Promotes Brain Health
Carrot juice is packed with antioxidants and potassium, which help improve brain function and prevent cognitive decline. The antioxidants in carrots protect the brain from oxidative stress and inflammation, both of which contribute to memory loss and neurodegenerative diseases.
How it helps: Drinking carrot juice may enhance memory, improve focus, and protect the brain from conditions like Alzheimer’s disease.
9. Reduces Cancer Risk
Carrot juice contains carotenoids and other powerful antioxidants that help protect cells from oxidative damage. Some studies suggest that the beta-carotene in carrots may reduce the risk of certain types of cancer, including lung and colon cancer.
How it helps: Consuming carrot juice regularly may lower the risk of developing cancer by neutralizing harmful free radicals.
10. Detoxifies the Liver
Carrot juice acts as a natural detoxifier for the liver, helping to flush out toxins and support liver function. The antioxidants in carrot juice assist the liver in eliminating harmful substances, leading to better overall health.
How it helps: Drinking carrot juice promotes liver health by aiding in detoxification and supporting overall liver function.
How to Make Fresh Carrot Juice:
Making carrot juice at home is simple and ensures you get all the health benefits without any added sugars or preservatives.
Ingredients:
4-5 fresh carrots (washed and peeled)
1/2 cup of water
Lemon or ginger (optional, for flavor)
Instructions:
Chop the carrots into small pieces.
Blend the carrots with water until smooth.
Strain the juice through a fine mesh sieve or cheesecloth to remove the pulp.
Add lemon or ginger for extra flavor if desired.
Drink immediately to enjoy the full benefits.
Conclusion: A Nutrient-Rich Drink for Better Health
Carrot juice is an easy, delicious, and nutrient-dense drink that offers numerous health benefits, from improved vision and better skin to enhanced heart health and stronger bones. Adding a glass of carrot juice to your daily routine can significantly boost your overall health and well-being. Enjoy this golden drink and reap its remarkable benefits!
If you’re looking for a natural, homemade remedy to soothe coughs, sore throats, and tackle flu symptoms, this simple syrup made from ginger, onion, and lemon is the perfect solution. It’s economical, easy to make, and packed with ingredients known for their medicinal properties. This syrup can help boost your immune system and relieve discomfort quickly.
Ingredients:
1 medium onion (finely chopped)
2-inch piece of fresh ginger (grated)
1 whole lemon (sliced)
1 cup water
2-3 tablespoons of honey (optional for added sweetness and throat relief)
How to Make the Cough and Cold Syrup:
1. Prepare the Ingredients
Start by chopping the onion, grating the fresh ginger, and slicing the lemon. These three ingredients are loaded with powerful health benefits:
Onions: Known for their anti-inflammatory and antimicrobial properties, onions help clear the airways and fight infections.
Ginger: Ginger has anti-inflammatory and antioxidant properties that help soothe sore throats, reduce coughing, and boost the immune system.
Lemon: Rich in vitamin C, lemons help boost immunity and fight off cold and flu symptoms.
2. Boil the Water and Ingredients
In a small pot, add the 1 cup of water along with the chopped onion, grated ginger, and sliced lemon. Bring it to a boil, then reduce the heat and let it simmer for about 10-15 minutes to extract all the beneficial compounds from the ingredients.
3. Strain the Syrup
After simmering, strain the mixture into a clean jar or bottle, discarding the solids. This will leave you with a smooth, nutrient-rich syrup.
4. Add Honey (Optional)
For extra throat-soothing properties and sweetness, you can stir in 2-3 tablespoons of honey once the syrup cools slightly. Honey is known for its natural antibacterial properties and is excellent for calming irritated throats and reducing coughing.
How to Use the Syrup:
Adults: Take 1-2 tablespoons of the syrup 2-3 times a day to relieve coughs, sore throats, and cold symptoms.
Children: If you’re giving it to children, use 1 teaspoon 2-3 times a day. (Note: Do not give honey to children under the age of 1.)
Why This Syrup Works:
Boosts Immunity: The combination of ginger, onion, and lemon strengthens your immune system, helping your body fight off colds, flu, and infections faster.
Soothes Coughs and Throats: Ginger and honey work together to reduce coughing and provide relief from sore throats, while lemon adds a burst of vitamin C to speed up recovery.
Natural and Economical: Made with common household ingredients, this syrup is not only effective but also affordable and free of any synthetic chemicals.
Conclusion: A Simple, Effective Remedy
This ginger, onion, and lemon syrup is a powerful, natural remedy for fighting colds, flu, and soothing coughs and sore throats. It’s easy to make at home and is a great alternative to over-the-counter medicines. Give it a try next time you feel a cold coming on and experience the relief it brings!