Crabgrass is often viewed as a pesky weed that invades lawns and gardens, but recent studies and traditional practices have revealed that this resilient plant offers numerous benefits. From its nutritional value to its environmental advantages, crabgrass is more than just an unwanted guest in your yard. Here’s how crabgrass can be beneficial and why it might deserve a second look.
Nutritional Value
Rich in Nutrients
Crabgrass seeds are a valuable source of nutrients. They are rich in proteins, vitamins, and minerals, making them a nutritious addition to diets in some cultures.
Proteins: Essential for muscle repair and growth.
Vitamins: Such as vitamin E, which is important for skin health and immune function.
Minerals: Including magnesium, calcium, and potassium, crucial for various bodily functions.
Edible Leaves and Seeds
In some parts of the world, the leaves and seeds of crabgrass are consumed. The young leaves can be used in salads or cooked as a leafy green, while the seeds can be ground into flour for baking.
Environmental Benefits
Erosion Control
Crabgrass has a robust root system that helps to stabilize soil and prevent erosion. Its ability to grow quickly and cover the ground makes it an effective plant for controlling soil erosion on slopes and disturbed lands.
Drought Tolerance
Crabgrass is highly drought-tolerant and can thrive in conditions where other grasses may fail. This makes it a valuable plant for maintaining green cover and preventing soil degradation in arid and semi-arid regions.
Agricultural Benefits
Forage for Livestock
Crabgrass is a nutritious forage option for livestock. It provides a good source of fodder during the summer months when other forages might be scarce.
Digestibility: High digestibility, making it a good food source for cattle, goats, and sheep.
Palatability: Livestock generally find crabgrass palatable, ensuring they consume it readily.
Cover Crop
As a cover crop, crabgrass can help improve soil fertility by enhancing organic matter content and promoting microbial activity. Its quick growth also helps suppress other weeds, reducing the need for herbicides.
Medicinal Uses
Traditional Medicine
In various traditional medicine systems, crabgrass has been used for its healing properties. The plant is believed to have diuretic and anti-inflammatory effects.
Diuretic: Can help in flushing out toxins from the body by increasing urine production.
Anti-inflammatory: Used to reduce inflammation and pain in conditions like arthritis.
Practical Tips for Managing Crabgrass
While crabgrass has many benefits, it can still be invasive and challenging to manage in lawns and gardens where a uniform appearance is desired. Here are some practical tips for managing crabgrass:
Cultural Control
Mowing: Regular mowing at the appropriate height can help prevent crabgrass from setting seeds.
Watering: Deep and infrequent watering encourages the growth of deeper-rooted grasses over crabgrass.
Mechanical Control
Hand Pulling: For small infestations, hand pulling can be effective, especially when the soil is moist.
Tilling: Tilling the soil can help remove young crabgrass plants before they establish.
Chemical Control
Pre-emergent Herbicides: Applying pre-emergent herbicides in the spring can help prevent crabgrass seeds from germinating.
Post-emergent Herbicides: Use post-emergent herbicides to control existing crabgrass plants. Always follow the label instructions for safe and effective use.
Crabgrass, often regarded as a troublesome weed, has numerous benefits that are often overlooked. From its nutritional value to its environmental and agricultural advantages, crabgrass can be a valuable plant in various contexts. By understanding and managing it properly, we can unlock its potential benefits while keeping it under control in our lawns and gardens. Instead of viewing crabgrass solely as an adversary, consider its positive attributes and how it might contribute to a more sustainable and resilient environment.
Wild lettuce (Lactuca virosa), often called “opium lettuce,” has been used for centuries as a natural remedy for pain relief and relaxation. The milky white sap found inside the stems and leaves, known as lactucarium, is the most potent part of the plant. While it does not contain opiates, it has been traditionally valued for its mild sedative and analgesic properties.
In this article, we will explore how to collect wild lettuce sap, its benefits, common uses, and important safety considerations. Whether you’re new to herbal remedies or simply curious, this guide will help you understand what makes wild lettuce sap so special.
How to Collect Wild Lettuce Sap
Collecting wild lettuce sap requires patience and proper technique to extract the most from the plant. Here’s how to do it safely:
1. Identifying the Right Plant
Wild lettuce grows in open fields, roadsides, and disturbed soil areas.
It has tall, spiky leaves with a blue-green hue and can grow up to 6 feet tall.
When the stem is broken, it releases a milky white sap—this is lactucarium.
2. Harvesting the Sap
Choose mature plants: Older plants produce more sap.
Cut the stem near the base with a clean knife.
As the sap begins to ooze, collect it using a spoon or scrape it onto a glass plate.
Repeat the process: Make additional cuts higher up the stem and branches, allowing more sap to flow.
Let the sap dry naturally to form a brownish resin.
Store it in a small, airtight container away from moisture.
What Is Wild Lettuce Sap Used For?
People have used wild lettuce sap for generations, primarily as a natural pain reliever and mild sedative. Here are some of its most common uses:
Pain relief: Traditionally used for minor aches, headaches, and muscle pain.
Relaxation and sleep aid: Some people use it as a natural way to promote relaxation and better sleep.
Stress and anxiety relief: Mild sedative properties may help with tension and nervousness.
Cough suppression: Historically, it has been used in small amounts to help with persistent coughs.
Mild euphoric effects: While not intoxicating, it may create a sense of calm and well-being.
How to Use Wild Lettuce Sap
There are multiple ways to use wild lettuce sap, depending on personal preference and the intended effect.
1. As a Tincture
Mix dried sap with alcohol (vodka or brandy) in a small jar.
Let it sit for 2-4 weeks, shaking it occasionally.
Strain and store the liquid in a dropper bottle.
Start with a small dose, like 1-2 drops in water, and increase slowly if needed.
2. As a Tea (Using the Leaves, Not the Sap)
Boil 1-2 teaspoons of dried wild lettuce leaves in water.
Let it steep for 10-15 minutes.
Drink before bedtime for relaxation.
3. Direct Consumption (Not Recommended for Beginners)
Some herbalists consume a tiny amount of dried sap (a rice-grain-sized piece) dissolved in water or tea.
This method requires caution due to its potency.
4. External Use (For Pain Relief)
The sap can be mixed with a carrier oil (like coconut oil) and applied to sore muscles or joints.
Avoid using it on broken skin.
Important Disclaimer
This article is for informational purposes only. While wild lettuce sap has been traditionally used for various health benefits, it is not a medically approved treatment. We strongly recommend that anyone interested in using wild lettuce consult with a qualified healthcare professional before attempting to use it in any form.
Important considerations:
Dosage matters: Overuse can lead to nausea, dizziness, or other unwanted side effects.
Not for everyone: Pregnant women, children, and individuals with existing health conditions should avoid using wild lettuce without medical advice.
We take no responsibility for misuse: This article does not replace professional medical advice, and we are not responsible for any consequences resulting from self-experimentation.
Final Thoughts
Wild lettuce sap is a fascinating natural remedy with a long history of use. While it has promising traditional benefits, it is not a replacement for medical treatments. If you’re considering trying it, start with small amounts, do your research, and always consult a professional if you have any concerns.
Would you like to explore other powerful herbal remedies? Stay informed and stay safe!
Lactuca serriola, commonly known as prickly lettuce, is a plant that you’ve likely seen growing in fields, along roadsides, or even in your backyard. Often dismissed as a common weed, prickly lettuce is actually a plant with a rich history of medicinal use and remarkable health benefits. Despite its widespread presence, most people overlook this unassuming plant, unaware of its potential. Here’s why you should pay more attention to prickly lettuce and consider harnessing its power.
1. Rich in Nutrients
Prickly lettuce is packed with nutrients that can contribute to your overall health. The leaves of Lactuca serriola contain vitamins A, C, and K, as well as minerals like potassium, calcium, and magnesium. These nutrients are essential for maintaining healthy skin, boosting the immune system, and supporting bone health.
Nutritional Benefits:
Vitamin A: Supports eye health and immune function.
Vitamin C: Acts as an antioxidant and boosts the immune system.
Calcium and Magnesium: Essential for strong bones and proper muscle function.
2. Natural Pain Reliever
One of the most remarkable properties of prickly lettuce is its potential as a natural pain reliever. The plant contains a milky sap, known as latex, which has been traditionally used as a natural remedy for pain relief. This sap has mild analgesic and sedative properties, making it useful for alleviating minor aches and pains, as well as for promoting relaxation.
Traditional Uses:
Pain Relief: The latex of prickly lettuce has been used to ease headaches, joint pain, and muscle aches.
Sleep Aid: Due to its sedative effects, the plant has been used to help with insomnia and anxiety.
3. Anti-Inflammatory Properties
Prickly lettuce is also known for its anti-inflammatory properties. Compounds found in the plant, such as lactucopicrin, have been shown to reduce inflammation, which can be beneficial for conditions like arthritis and other inflammatory disorders.
Benefits:
Arthritis Relief: Regular consumption of prickly lettuce may help reduce inflammation and pain associated with arthritis.
General Inflammation: The plant’s anti-inflammatory effects can contribute to overall well-being by reducing chronic inflammation.
4. Supports Digestive Health
The leaves of Lactuca serriola can be used to support digestive health. The plant’s mild bitterness stimulates the production of digestive enzymes and bile, aiding in digestion and helping to alleviate issues like bloating and indigestion.
Digestive Benefits:
Improved Digestion: Consuming prickly lettuce may help promote healthy digestion and prevent digestive discomfort.
Natural Detoxification: The plant’s diuretic properties can help flush toxins from the body, supporting liver and kidney function.
5. Antioxidant Powerhouse
Prickly lettuce is rich in antioxidants, which help protect the body from oxidative stress and reduce the risk of chronic diseases. Antioxidants neutralize free radicals, unstable molecules that can damage cells and contribute to aging and disease.
Health Benefits:
Cell Protection: Antioxidants in prickly lettuce help protect cells from damage, promoting overall health.
Disease Prevention: Regular consumption of antioxidant-rich plants like prickly lettuce may reduce the risk of chronic diseases, such as heart disease and cancer.
6. Wild Edible Plant
Beyond its medicinal uses, prickly lettuce is also an edible plant. The young leaves can be eaten raw in salads or cooked as a leafy green. While the mature leaves can be bitter, they are still nutritious and can be added to soups, stews, or sautéed with other vegetables.
Culinary Uses:
Salads: Use young, tender leaves in fresh salads for a nutrient boost.
Cooked Greens: Add older leaves to soups or sauté them with garlic and olive oil for a healthy side dish.
7. Environmental Benefits
Prickly lettuce is a hardy plant that can thrive in poor soils and harsh conditions. It grows quickly and can help stabilize soil, prevent erosion, and even improve soil fertility over time. Additionally, it provides food and habitat for pollinators and other beneficial insects.
Ecological Contributions:
Soil Stabilization: Prickly lettuce helps prevent soil erosion, especially in disturbed areas.
Pollinator Support: The plant’s flowers attract bees and other pollinators, supporting local ecosystems.
8. Historical Significance
Prickly lettuce has been used for centuries in various cultures for its medicinal properties. It was traditionally used by ancient Egyptians as a sedative and pain reliever, and it was valued in medieval Europe for its calming effects.
Cultural Importance:
Ancient Remedy: Used by ancient cultures as a natural sedative and pain reliever.
Herbal Medicine: Prickly lettuce was commonly used in traditional European herbal medicine for its various health benefits.
Lactuca serriola, or prickly lettuce, is far more than just a common weed. This plant is a powerhouse of nutrients and medicinal properties that can benefit your health in numerous ways. Whether you’re looking for a natural pain reliever, a digestive aid, or a nutrient-rich addition to your diet, prickly lettuce has something to offer. So the next time you see this plant growing in your yard, think twice before pulling it out—its true value might surprise you.
Once dismissed as a common garden weed, purslane, also known as Verdolaga, has undergone a remarkable transformation into a celebrated superfood. Its resilience and versatility have earned it a spot on farmer’s market stands and in the kitchens of top chefs, transforming this humble plant into a nutritional powerhouse that can improve both your health and your garden. Whether you’re a seasoned gardener or a culinary enthusiast, there are plenty of reasons why you should welcome purslane into your life.
The Rise of Purslane: From Weed to Superfood
Purslane, sometimes referred to as hogweed or pigweed, is a plant that once struggled with a negative reputation. However, its remarkable health benefits and culinary potential have led to a resurgence in popularity. Once considered an undesirable nuisance in many gardens, this hardy plant has now found a place of honor in the kitchens of forward-thinking chefs, health-conscious consumers, and even nutritional experts. Famous historical figures such as Mahatma Gandhi praised purslane for its versatility, and today it’s reclaiming its rightful place in our diets.
This remarkable plant is capable of thriving in even the harshest conditions, whether it’s sprouting through cracks in the sidewalk or flourishing in your garden. Dr. Artemis Simopoulos, the president of the Centre for Genetics, Nutrition, and Health, has called purslane a “miracle plant,” particularly after discovering its incredibly high levels of Omega-3 fatty acids—higher than any other green plant.
Purslane’s teardrop-shaped, succulent leaves are packed with essential nutrients, antioxidants, and vitamins. Its slightly tart, peppery flavor makes it a favorite among chefs, and it adds a zesty, refreshing twist to a variety of dishes. Chef Sergio Vitale, the owner of Aldo’s Ristorante Italiano, recalls growing up with purslane in southern Italy, where it was cherished not only for its flavor but also its culinary adaptability.
Despite being a staple in early American kitchens—famously enjoyed by Martha Washington—purslane lost its popularity in the early 20th century. Today, however, a growing number of farmers, foragers, and chefs are bringing this nutrient-dense plant back into the spotlight.
8 Irresistible Reasons to Embrace Purslane
An Exceptional Source of Omega-3 Fatty Acids Omega-3s are essential for heart and brain health, and purslane is one of the best plant-based sources of these vital fatty acids. It’s especially beneficial for those following vegan or plant-based diets, as it offers a rare, non-animal source of Omega-3s. These fatty acids help reduce inflammation, support cognitive function, and promote overall cardiovascular health.
Packed with Antioxidants Purslane is loaded with antioxidants, including glutathione, a potent compound known for protecting cells from oxidative damage. By neutralizing free radicals, antioxidants help reduce the aging process, protect the body from diseases, and boost overall health. Regularly consuming purslane can help improve your skin, support cell health, and delay the signs of aging.
Rich in Essential Minerals This humble plant is a veritable mineral powerhouse. It’s packed with calcium, magnesium, potassium, and iron, making it an excellent dietary addition for anyone looking to boost their intake of vital minerals. These minerals play important roles in bone health, muscle function, heart health, and red blood cell production, among other things.
A Natural Immune System Boost with Vitamin C Purslane is rich in Vitamin C, a crucial nutrient that supports the immune system and helps protect the body against illnesses. As a potent antioxidant, Vitamin C also promotes healthy skin, aids in collagen production, and supports the healing of wounds, making purslane a great addition to your diet, especially during cold and flu season.
Beta-Carotene for Healthy Vision and Skin Beta-carotene, which is converted into Vitamin A in the body, is found in abundance in purslane. This powerful antioxidant supports eye health by maintaining good vision and reducing the risk of age-related macular degeneration. Beta-carotene also contributes to healthy skin by protecting it from the harmful effects of UV radiation and supporting the production of collagen.
Melatonin for Better Sleep Purslane is one of the few plants that contains melatonin, a hormone that helps regulate sleep patterns. If you struggle with sleepless nights or poor sleep quality, purslane may offer a natural solution to improving your rest. The melatonin in purslane can promote better sleep by enhancing your body’s natural sleep-wake cycle, helping you wake up feeling refreshed and rejuvenated.
Cholesterol Management Purslane’s rich content of betalains, a group of plant compounds, has been shown to help reduce LDL cholesterol (the “bad” cholesterol) and improve cardiovascular health. These compounds protect blood vessels and help maintain healthy blood pressure levels, ultimately supporting a healthier heart.
Mood Regulation with Tryptophan Purslane contains tryptophan, an amino acid that plays a crucial role in serotonin production. Serotonin is often referred to as the “feel-good” hormone, and it helps regulate mood, alleviate stress, and combat depression. Consuming purslane regularly can help maintain a balanced mood and contribute to emotional well-being.
A Simple Purslane Recipe to Try: Purslane and Basil Pesto
Now that you know about the impressive health benefits of purslane, why not try incorporating it into your meals? Here’s a simple and delicious recipe for Purslane and Basil Pesto that can be used as a spread, dip, or pasta sauce.
Ingredients:
2 cups young purslane leaves and stems, rinsed and chopped
45g basil leaves, rinsed
1 clove garlic
45g toasted almonds
Juice of half a lemon
50ml olive oil
Salt and pepper to taste
Instructions:
Combine purslane, basil, garlic, almonds, and lemon juice in a food processor.
Pulse until everything is well-blended.
Slowly drizzle in the olive oil while the processor is running until the mixture emulsifies.
Season with salt and pepper to taste.
Enjoy this vibrant pesto as a spread, dip, or toss it with pasta for a nutritious, flavorful dish.
Final Thoughts
Purslane is far more than just a garden weed—it’s a nutrient-packed superfood with a wide range of health benefits. From its rich Omega-3 content to its antioxidant power, mineral richness, and culinary versatility, this plant deserves a place in both your garden and your kitchen. Whether you choose to add it to salads, soups, or pesto, purslane offers a refreshing, flavorful way to enhance your health.
So, the next time you spot purslane growing in your garden or at your local farmer’s market, don’t dismiss it—embrace it! With its numerous health benefits and delicious taste, purslane is a plant you’ll want to cultivate and enjoy for years to come.
The Stonebreaker plant, known as Phyllanthus niruri or “Chanca Piedra” in Spanish, has earned a reputation as a natural health powerhouse. Renowned for its remarkable ability to dissolve kidney stones and support liver function, this small yet mighty herb has been a cornerstone of traditional medicine for centuries. Let’s uncover the incredible benefits of the Stonebreaker plant, how it promotes vital organ health, and the best ways to integrate it into your daily wellness routine.
What is the Stonebreaker Plant?
Native to tropical regions such as South America, India, and Southeast Asia, the Stonebreaker plant is a small herbaceous plant with delicate green leaves and tiny flowers. Its name comes from its historical use in breaking down kidney stones and gallstones, making it a celebrated remedy for urinary and digestive health.
Key Health Benefits
1. Promotes Kidney Health
The Stonebreaker plant is celebrated for its diuretic and anti-lithic (stone-dissolving) properties. It helps:
Naturally break down kidney stones and reduce their size.
Prevent the formation of new stones by inhibiting mineral crystallization.
Flush toxins and support overall urinary health.
2. Boosts Liver Function
Rich in antioxidants and phytochemicals, the plant offers protective benefits to the liver by:
Reducing inflammation and oxidative stress, crucial for liver health.
Enhancing detoxification processes to cleanse the body.
Promoting the regeneration of liver cells, particularly beneficial for conditions like fatty liver disease or hepatitis.
3. Enhances Digestive Health
This herb also supports the digestive system by:
Easing symptoms of indigestion, bloating, and stomach discomfort.
Helping the body absorb nutrients more efficiently.
4. Anti-Inflammatory and Antimicrobial Benefits
The bioactive compounds in the Stonebreaker plant have powerful anti-inflammatory and antimicrobial properties, which can:
Combat infections, including urinary tract infections (UTIs).
Reduce inflammation in the body, providing relief for a range of chronic conditions.
How to Use the Stonebreaker Plant
Incorporating the Stonebreaker plant into your daily routine is simple and versatile:
Herbal Tea: Steep dried leaves in hot water for a soothing and health-boosting tea.
Capsules or Tablets: A convenient option available in most health food stores.
Liquid Extract: A concentrated tincture that absorbs quickly into the body.
Suggested Dosage
For adults, recommended usage includes:
Tea: 1–2 cups daily.
Capsules: Follow the product’s instructions, typically 500–1000 mg per day.
Extract: 20–30 drops diluted in water, taken twice daily.
Always consult a healthcare professional before adding new supplements to your regimen, especially if you have pre-existing medical conditions.
Precautions and Side Effects
While the Stonebreaker plant is generally safe, it’s essential to use it responsibly:
Avoid prolonged use without breaks to prevent overuse effects.
Monitor for allergic reactions or sensitivity.
Pregnant or breastfeeding women should seek medical advice before use.
Conclusion
The Stonebreaker plant is a natural, affordable, and effective remedy for supporting liver and kidney health. Whether you aim to prevent kidney stones, detoxify your liver, or enhance overall wellness, this herb is a valuable addition to your health routine.
Embrace the ancient wisdom of nature with the Stonebreaker plant and take a proactive step toward a healthier, more vibrant life. With its powerful healing properties, this humble herb proves that nature often holds the best solutions for our well-being.
Our signature Green Detox Juice is packed with fresh, nutrient-rich ingredients to fuel your body and refresh your senses. Made with kale, cucumber, celery, green apples, ginger, and lemon juice, this vibrant blend is a powerhouse of vitamins, minerals, and antioxidants that promote overall wellness.
Kale, known as a superfood, is loaded with fiber, iron, and vitamin K, while cucumber and celery help keep you hydrated and support digestion. Green apples add a touch of natural sweetness while providing essential fiber to aid gut health. The combination of these greens makes for a perfectly balanced drink that nourishes from within.
Ginger and lemon juice bring an invigorating kick to this juice, enhancing both its flavor and health benefits. Ginger supports digestion, reduces inflammation, and boosts immunity, while lemon juice is packed with vitamin C and helps alkalize the body. Together, they create a zesty, refreshing taste that leaves you feeling revitalized.
Whether you’re looking for a morning energy boost, a post-workout refresher, or a natural way to detox, this green juice is a perfect choice. Sip on it daily to support your immune system, improve digestion, and give your body the nourishment it deserves. Try it today and feel the difference!
Euphorbia Hirta, also known as asthma weed or snakeweed, is a medicinal herb known for its therapeutic properties. This plant has been used for centuries in traditional medicine, offering a variety of health benefits. However, it is essential to understand both its uses and potential risks before incorporating it into your routine. This article provides an overview of the benefits of Euphorbia Hirta, detailed usage tips, and a disclaimer for safe use.
Introduction to Euphorbia Hirta
Euphorbia Hirta grows in tropical and subtropical climates, often found in open fields or roadsides. Its leaves, stems, and flowers are rich in bioactive compounds, making it a popular choice in herbal remedies. While it offers numerous benefits, the plant should be used cautiously due to its potential toxicity. Always consult a specialist before using Euphorbia Hirta for any health-related purposes.
30 Benefits of Euphorbia Hirta
Supports Respiratory Health
Known for relieving asthma symptoms, it can be used as an herbal tea to ease breathing difficulties.
Relieves Cough
Euphorbia Hirta tea can help soothe dry or persistent coughs. Boil a handful of fresh leaves in water and drink warm.
Eases Bronchitis Symptoms
The plant’s anti-inflammatory properties may reduce bronchial swelling and irritation.
Improves Digestion
Drinking Euphorbia Hirta tea helps alleviate indigestion and bloating.
Relieves Diarrhea
It acts as a natural remedy for diarrhea when consumed in small quantities.
Treats Dysentery
Euphorbia Hirta has antimicrobial properties that help combat infections causing dysentery.
Soothes Stomach Ulcers
The plant’s compounds may protect the stomach lining and promote healing. Consume as tea, but only under professional guidance.
Reduces Fever
It has been traditionally used to lower body temperature during fevers. A decoction can be applied externally as a compress.
Boosts Immunity
Regular consumption of diluted Euphorbia Hirta tea may strengthen the immune system.
Supports Skin Healing
Crushed leaves applied as a poultice can help heal minor wounds and reduce swelling.
Treats Skin Infections
Its antibacterial properties make it effective for treating fungal and bacterial skin infections.
Reduces Acne
A diluted leaf extract can be applied to acne-prone areas to reduce inflammation.
Manages Eczema
Topical application of Euphorbia Hirta may relieve itching and irritation associated with eczema.
Controls Dandruff
A mild herbal rinse made from the plant can help reduce dandruff.
Reduces Menstrual Cramps
Euphorbia Hirta tea may ease menstrual pain by relaxing muscles.
Balances Hormones
The plant may assist in regulating hormonal imbalances when used as a herbal tonic.
Improves Lactation
Euphorbia Hirta has been traditionally used to enhance milk production in nursing mothers. Always consult a specialist before use.
Helps in Urinary Tract Infections (UTIs)
Its diuretic properties can help flush out infections. Drink as a tea in small doses.
Combats Parasites
Known for its antiparasitic effects, it can be used to treat intestinal worms under expert guidance.
Reduces Anxiety
Euphorbia Hirta may have calming effects on the nervous system. Drink as tea in moderation.
Supports Heart Health
The plant’s compounds may improve circulation and reduce cholesterol levels.
Manages Diabetes
It may help regulate blood sugar levels. Use only under professional supervision.
Relieves Joint Pain
A poultice made from its leaves can be applied to swollen joints for relief.
Treats Toothache
Chewing a small piece of the leaf or applying its juice may help numb tooth pain.
Combats Mouth Ulcers
Rinse your mouth with a mild Euphorbia Hirta decoction to soothe ulcers.
Improves Eye Health
The plant’s juice can be diluted and used as an eye wash to treat mild infections.
Aids Wound Healing
Applying the crushed leaves directly on cuts or bruises can speed up recovery.
Reduces Inflammation
Its anti-inflammatory properties help manage conditions like arthritis and swelling.
Improves Blood Circulation
Regular use may support healthy blood flow, reducing the risk of blood clots.
Supports Detoxification
Euphorbia Hirta acts as a mild detoxifying agent, helping to eliminate toxins from the body.
How to Use Euphorbia Hirta
As a Tea
Boil 1-2 grams of dried Euphorbia Hirta leaves in 1 cup of water. Drink no more than 1-2 cups per day.
Topical Application
Crush fresh leaves into a paste and apply to the affected area for skin issues or wounds.
As a Compress
Soak a clean cloth in a warm decoction of Euphorbia Hirta and apply it to inflamed or swollen areas.
Potential Risks and Disclaimer
While Euphorbia Hirta offers many health benefits, it contains compounds that can be toxic if used improperly or in excessive amounts. Common side effects may include nausea, vomiting, or skin irritation. Pregnant and breastfeeding women, as well as children, should avoid using this plant unless advised by a healthcare professional.
This article is for informational purposes only. We are not medical experts, and the information provided here is not intended to diagnose, treat, or cure any condition. Always consult a qualified specialist before using Euphorbia Hirta for health purposes.
By understanding its benefits and risks, you can safely explore the potential of this incredible herb while protecting your well-being.
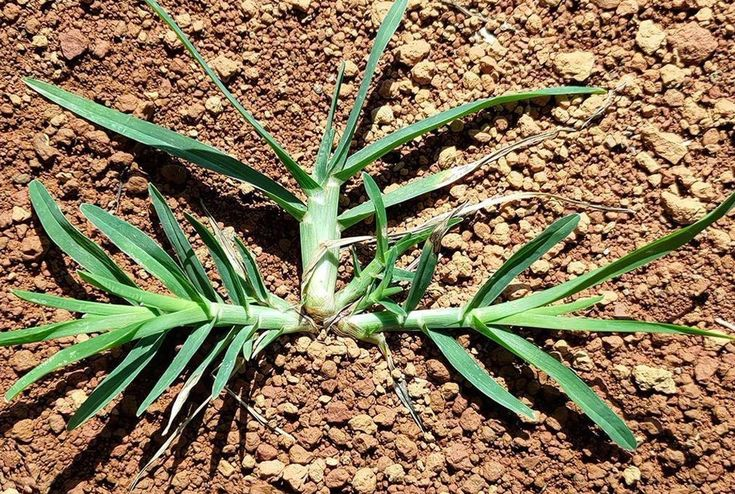
Goose grass, also known as cleavers or Galium aparine, is often dismissed as a common garden weed, but this plant has been used for centuries in traditional medicine for its remarkable therapeutic properties. From promoting kidney health to soothing skin irritations, goose grass offers a wide range of health benefits. In this detailed guide, we will explore how to properly identify, harvest, prepare, and use goose grass for various health conditions.
1. Identification and Harvesting
Identifying Goose Grass:
Goose grass is easily identified by its long, slender stems that can grow up to several feet in length. The plant features tiny, greenish-white star-shaped flowers that bloom in clusters. One of its most distinctive characteristics is the small, hook-like hairs on its stems and leaves, which allow the plant to cling to clothing, fur, and other plants. The leaves are narrow, lance-shaped, and arranged in whorls around the stem. Knowing how to properly identify goose grass is crucial for safe harvesting and use.
Best Time to Harvest:
The optimal time to harvest goose grass is in the spring, just before the plant flowers. During this period, the young shoots are at their most tender and potent, containing the highest levels of beneficial compounds. To harvest, simply snip the stems close to the ground. Be sure to gather from areas free of pesticides and pollution to ensure the plant’s purity and safety.
2. Preparation for Medicinal Use
Cleaning and Drying Goose Grass:
After harvesting, it’s important to clean the goose grass thoroughly. Rinse the stems and leaves under cool running water to remove any dirt or insects. Goose grass can be used fresh, but drying it allows for longer storage. To dry, bundle the stems together and hang them upside down in a well-ventilated area out of direct sunlight. Once dried, the plant can be stored in an airtight container for several months.
Here are three beneficial recipes using goose grass that you can easily prepare:
1. Goose Grass Tea
Ingredients:
2 teaspoons of dried goose grass (or 4 teaspoons of fresh)
1 cup of boiling water
Instructions:
Place the dried or fresh goose grass in a cup.
Pour boiling water over it and steep for about 10 minutes.
Strain the tea and enjoy up to three times daily. Benefits: This tea is known for its detoxifying properties, promoting lymphatic drainage, purifying the blood, and supporting kidney function.
2. Goose Grass Infusion
Ingredients:
A handful of fresh goose grass (with roots)
4 cups of water
Instructions:
Wash the goose grass and its roots thoroughly.
In a pot, bring 4 cups of water to a boil.
Add the washed goose grass to the boiling water and simmer for 15-20 minutes.
Strain the liquid and let it cool slightly before drinking. Benefits: This infusion can help alleviate back pain and bone issues, thanks to its anti-inflammatory properties.
3. Goose Grass Smoothie
Ingredients:
1 cup of fresh goose grass
1 banana
1 cup of spinach
1 cup of almond milk (or any milk of choice)
Honey or sweetener to taste (optional)
Instructions:
Wash the fresh goose grass thoroughly.
In a blender, combine the goose grass, banana, spinach, and almond milk.
Blend until smooth. Add honey or sweetener if desired.
Pour into a glass and enjoy! Benefits: This nutritious smoothie combines the detoxifying effects of goose grass with the vitamins from spinach and banana, providing a refreshing and healthy drink. ✨
3. Therapeutic Uses
Skin Irritations and Wounds:
Goose grass is well-known for its ability to soothe skin irritations and promote healing. It can be used to treat conditions such as eczema, psoriasis, and minor wounds. To make a poultice, crush fresh goose grass leaves and apply them directly to the affected area. The plant’s anti-inflammatory properties help reduce redness and swelling, while its antibacterial qualities aid in preventing infection.
Kidney Health and Detoxification:
As a powerful diuretic, goose grass is excellent for flushing toxins from the body through the kidneys. Regular consumption of goose grass tea can help prevent and relieve urinary tract infections, reduce water retention, and support overall kidney health. This makes it a valuable herb for detoxification regimens.
Lymphatic System Support:
Goose grass is often used to support the lymphatic system, which is crucial for maintaining a healthy immune response. The plant’s cleansing properties help to reduce lymphatic swelling (lymphadenopathy) and can be beneficial in treating conditions like lymphedema. Incorporating goose grass into your diet or using it topically can enhance lymphatic drainage and improve immune function.
4. Additional Benefits
Weight Loss Aid:
Due to its diuretic effects, goose grass can be a useful addition to weight management efforts. By helping the body shed excess water weight and promoting detoxification, goose grass tea can complement a healthy diet and exercise routine.
Hair Care:
The high silica content in goose grass strengthens hair and improves its overall health. You can make a hair rinse by boiling a handful of fresh goose grass in water, letting it cool, and then using the liquid as a final rinse after shampooing. This rinse adds shine to the hair and helps prevent breakage.
5. Cautions and Considerations
Allergy Alert:
As with any herbal remedy, it’s important to test goose grass on a small area of skin before using it extensively, especially if you have sensitive skin or a history of allergies. Some individuals may experience mild irritation or an allergic reaction.
Consult a Healthcare Provider:
While goose grass is generally safe for most people, it’s wise to consult with a healthcare provider before incorporating it into your routine, particularly if you have pre-existing health conditions or are pregnant or breastfeeding.
6. Goose Grass Tea, Smoothies, and Soups
Goose Grass Tea:
As mentioned earlier, goose grass tea is a simple and effective way to enjoy the plant’s detoxifying benefits. Drink it regularly to support your lymphatic system and overall health.
Goose Grass Smoothies:
For a nutrient-packed smoothie, blend fresh goose grass leaves with fruits like bananas, apples, and a handful of spinach. Add a splash of coconut water or almond milk for a refreshing, healthy drink that supports digestion and detoxification.
Goose Grass Soup:
To make a nutritious soup, simmer goose grass with vegetables such as carrots, celery, and onions. Add a dash of olive oil, salt, and pepper to taste. This soup is not only comforting but also beneficial for your kidneys and immune system.
Goosegrass Pesto Recipe
Ingredients:
1 cup fresh Goosegrass (young tips work best)
1 clove garlic
1/4 cup grated Parmesan cheese (optional for extra flavor)
1/4 cup olive oil (adjust to desired consistency)
1/4 cup toasted nuts (cashews, walnuts, or pine nuts – optional for creaminess)
A squeeze of fresh lemon juice
Salt and pepper to taste
Instructions:
Wash the Goosegrass thoroughly and remove any tough stems.
In a blender or food processor, combine Goosegrass, garlic, Parmesan (if using), and nuts.
Slowly drizzle in olive oil while blending until the mixture reaches your desired pesto consistency.
Add a squeeze of lemon juice and season with salt and pepper to taste.
Blend once more and adjust seasoning if necessary.
Enjoy this vibrant pesto over pasta, as a spread on bread, or as a topping for grilled vegetables!
7. Where to Find Goose Grass
Where to Find:
Goose grass is commonly found in gardens, meadows, and along the edges of woodlands. It thrives in nutrient-rich, moist soil and often grows in shaded or semi-shaded areas. If you’re unable to forage for it yourself, dried goose grass can sometimes be found in health food stores or online herbal shops.
Conclusion
Goose grass is much more than a common weed; it’s a powerful medicinal plant with a wide range of therapeutic uses. Whether you’re looking to detoxify your body, soothe skin irritations, or support your lymphatic system, this versatile herb has something to offer. By learning how to properly identify, prepare, and use goose grass, you can tap into its natural healing properties and make it a valuable part of your health and wellness routine.
Goosegrass, scientifically known as Eleusine indica, is a time-tested herb widely used in traditional medicine for its impressive health benefits. One of its most notable advantages is its natural ability to support kidney health. This article will guide you through how Goosegrass can improve kidney function, how to use it effectively, and why it should be part of your wellness routine.
Understanding Goosegrass and Its Impact on Kidney Health
The kidneys play a vital role in filtering waste and excess fluids from the body. Goosegrass acts as a powerful natural diuretic, encouraging the elimination of water and salts. This diuretic effect reduces water retention, eases the kidneys’ workload, and promotes overall detoxification.
Key Benefits of Goosegrass for Kidney Function
Natural Diuretic Action: Goosegrass increases urine production, helping the kidneys flush out toxins and prevent urinary tract issues.
Supports Detoxification: This herb assists in removing metabolic waste and excess minerals, reducing strain on the kidneys.
Antioxidant Protection: Rich in antioxidants, Goosegrass shields the kidneys from oxidative stress and damage.
Why Choose Goosegrass for Kidney Health?
Adding Goosegrass to your health regimen is a natural and cost-effective way to support kidney health. Incorporating Goosegrass products, such as teas or supplements, into your daily routine can make a significant difference. Look for high-quality Goosegrass products online or at health stores for maximum benefits.
Goosegrass Tea: A Soothing Remedy
Ingredients:
1 handful of fresh or dried Goosegrass leaves
3 cups of water
Instructions:
Boil the Goosegrass leaves in water for 10-15 minutes.
Strain the mixture and let it cool slightly.
Enjoy a cup daily, preferably in the morning, to support kidney detoxification.
Goosegrass Powder Supplements: Convenient and Potent
Usage:
Take 500 mg of Goosegrass powder in capsule form daily.
Always consult your healthcare provider for personalized dosage recommendations.
Goosegrass Juice or Smoothie Boost
Preparation:
Add a few fresh Goosegrass leaves to your green juice or smoothie.
Consume 2-3 times weekly for gentle detoxification.
Topical Goosegrass Poultices for Swelling Relief
Instructions:
Crush fresh Goosegrass leaves into a paste.
Apply to swollen areas for 10-15 minutes.
Rinse off with warm water.
Though not directly affecting the kidneys, applying Goosegrass poultices can help reduce body swelling, indirectly easing kidney strain.
Important Safety Considerations
Consult a Professional: Speak with a healthcare provider if you have kidney conditions, are pregnant, or are on medication.
Moderation is Key: Do not overuse Goosegrass; stick to recommended doses to avoid unwanted side effects.
Where to Buy Goosegrass Products
For optimal results, purchase high-quality Goosegrass products. Look for organic Goosegrass tea, powder supplements, and dried leaves from trusted online health stores or local herbal shops.
Benefits of Goosegrass for Kidney Health
Detoxifies the Body: Helps flush toxins through increased urination.
Reduces Water Retention: Eases swelling and bloating.
Prevents Urinary Tract Infections: Maintains a healthy urinary system.
How to Use Goosegrass Effectively
Daily Tea: Drink Goosegrass tea each morning.
Supplement Form: Take Goosegrass capsules as advised by a professional.
Smoothie Addition: Blend fresh Goosegrass into juices weekly
Final Thoughts on Goosegrass for Kidney Support
Goosegrass (Eleusine indica) is a natural and powerful herb for kidney health. Its diuretic, detoxifying, and anti-inflammatory properties make it an excellent choice for supporting overall kidney function. Start incorporating Goosegrass into your daily routine through teas, supplements, or smoothies to experience its full benefits.
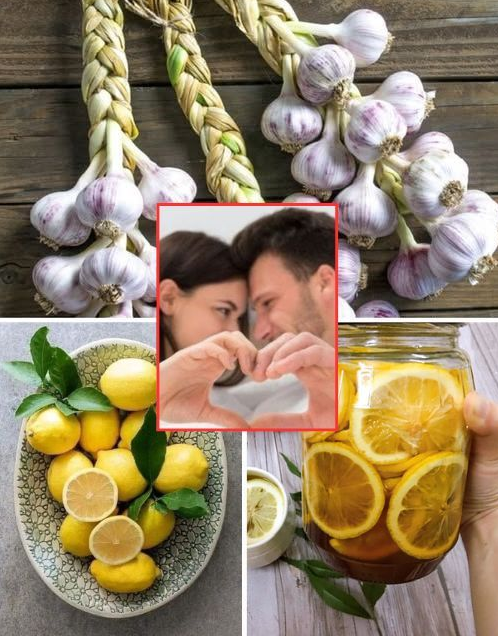
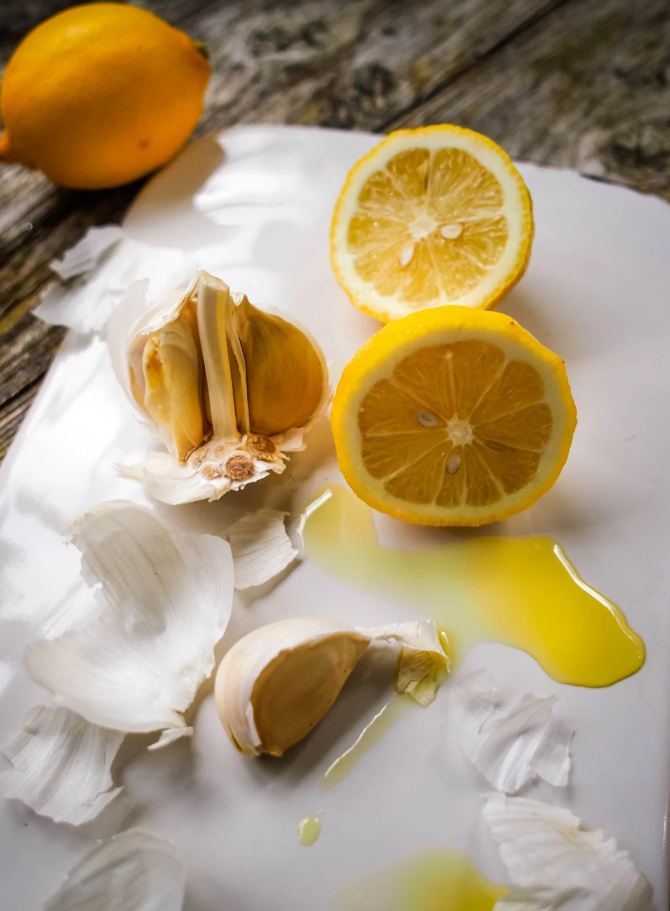
Every man desires confidence, energy, and stamina, especially in the bedroom. The good news? Achieving peak performance is easier than you think. A simple yet powerful natural remedy—garlic and lemon—can significantly enhance male vitality, improve circulation, and boost overall energy levels. These two superfoods, when combined, work synergistically to optimize health, support endurance, and elevate performance. Let’s dive into how this powerful combination can change your life and help you feel your best.
The Science Behind Garlic and Lemon
1. Garlic: The Ultimate Circulation Booster
Garlic has long been celebrated for its medicinal properties, particularly for its ability to improve blood circulation. It contains a compound known as allicin, which helps to dilate blood vessels and increase blood flow. Proper circulation is essential for stamina and endurance, especially when it comes to sexual performance. Research published in the Journal of Nutrition highlights garlic’s ability to lower blood pressure and improve vascular health, making it a crucial ingredient for men aiming to maintain peak physical performance. Improved circulation means better oxygen flow to your muscles, heart, and vital organs, which is key for sustained energy levels and stamina.
2. Lemon: The Metabolism and Testosterone Enhancer
Lemons are a fantastic source of vitamin C, a nutrient that plays a pivotal role in testosterone production and reducing oxidative stress. Testosterone is the hormone behind male energy, drive, and endurance, making it essential for overall vitality. Lemons also contain citric acid, which aids in nutrient absorption, ensuring that your body can maximize the benefits from the foods you consume. A well-functioning metabolism leads to increased energy levels, meaning you can perform at your best not just in the bedroom but throughout the day.
Key Benefits of Garlic and Lemon for Men
1. Enhanced Blood Circulation for Peak Performance
Garlic helps to dilate blood vessels, reducing the risk of plaque buildup and improving overall blood flow. Lemon, with its natural nitric oxide content, works in tandem with garlic to further enhance circulation. Improved circulation directly contributes to stamina and endurance, making this combination ideal for men who want to maintain lasting performance. Whether you’re looking to stay energetic during your daily activities or improve performance in intimate moments, better circulation plays a crucial role.
2. Increased Testosterone Levels for More Energy
Both garlic and lemon are rich in key nutrients that support testosterone production. Garlic contains selenium and zinc, minerals that are known to boost testosterone levels. Meanwhile, the high vitamin C content in lemon complements garlic’s efforts, creating a powerful synergy that naturally enhances testosterone production. Testosterone is the primary hormone driving male energy, drive, and endurance, making it vital for peak physical and sexual performance.
3. Reduced Inflammation for Better Endurance
Chronic inflammation is one of the hidden factors that drain energy and hinder performance. Garlic is known for its anti-inflammatory compounds, such as diallyl disulfide, which help reduce swelling and inflammation throughout the body. Similarly, lemon contains flavonoids that neutralize oxidative stress, further aiding in inflammation reduction. This combination helps lower inflammation markers in the body, contributing to overall health and stamina.
4. Increased Energy and Physical Stamina
Both garlic and lemon contribute to energy production in the body. Garlic improves mitochondrial function, which directly impacts how your body produces energy. It also helps enhance oxygen utilization, allowing for better endurance. On the other hand, lemon supports detoxification by promoting the removal of toxins from the body, which prevents fatigue and boosts energy levels. Together, these ingredients help men stay active, alert, and confident throughout the day, whether you’re working, exercising, or engaging in more intimate moments.
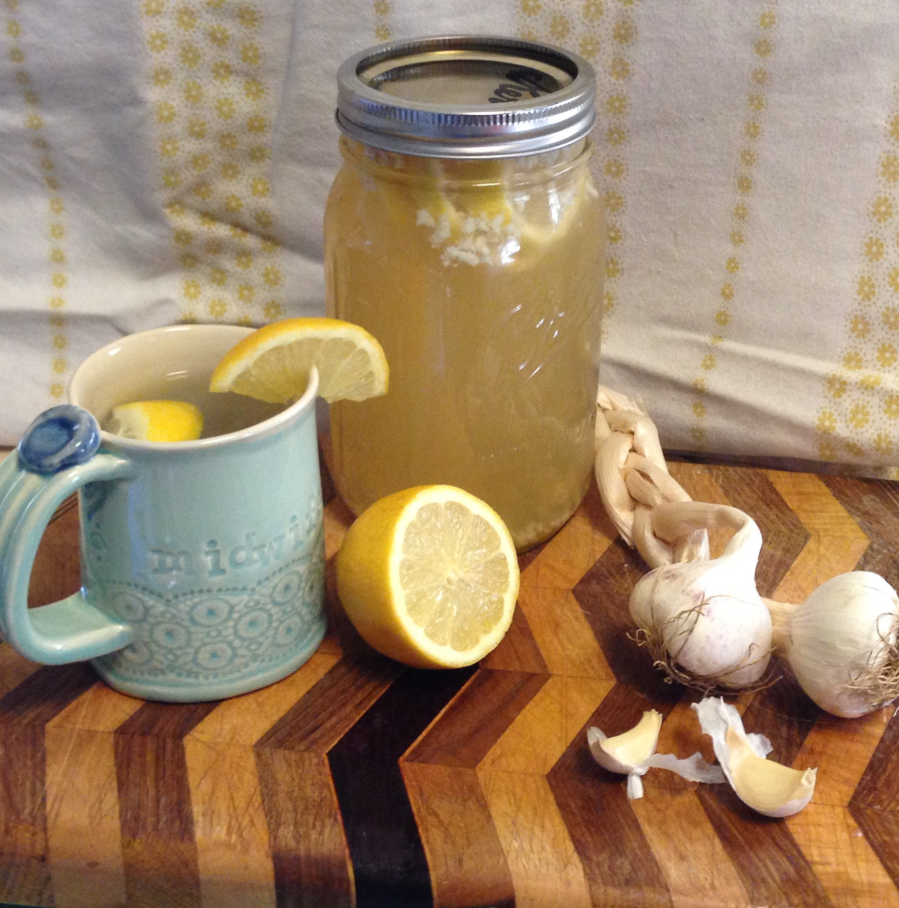
How to Use Garlic and Lemon for Maximum Benefits
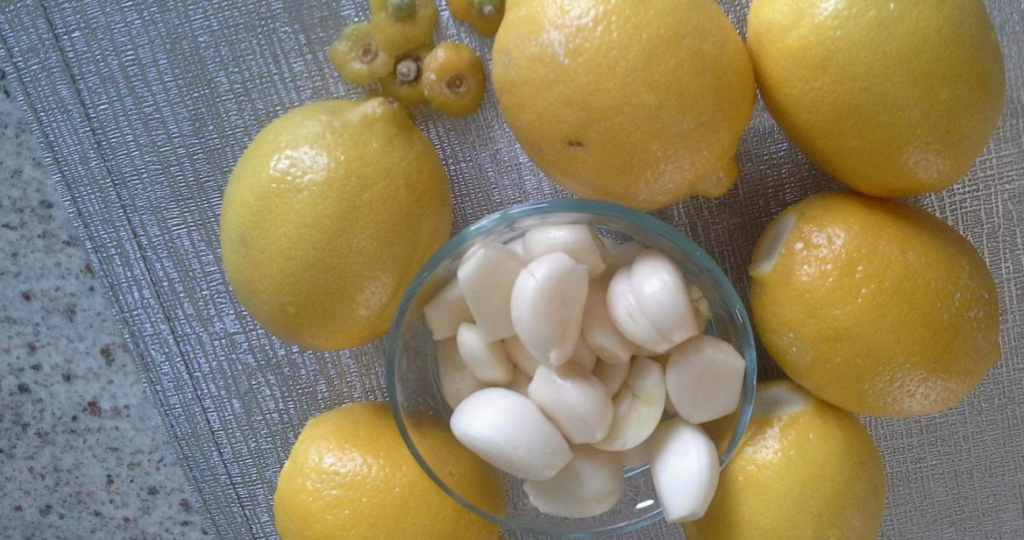
Ingredients Needed:
4 cloves of garlic (minced)
Juice of 2 lemons
1 cup of warm water
Honey (optional, for sweetness)
Step-by-Step Instructions:
Prepare the Garlic: Mince the garlic cloves finely to release its potent allicin, the active compound that boosts circulation.
Extract Lemon Juice: Squeeze the juice of two fresh lemons into a glass, ensuring you capture all of the beneficial vitamin C.
Combine Ingredients: Add the minced garlic and fresh lemon juice into a glass of warm water. Stir the mixture well.
Optional Sweetener: If you prefer a touch of sweetness, add honey to the drink, which also offers its own health benefits.
Drink on an Empty Stomach: For the best results, consume this mixture first thing in the morning on an empty stomach, or 30 minutes before meals.
Frequency of Consumption:
To experience the full benefits of garlic and lemon, drink this power shot daily. Many men begin noticing improvements in energy, stamina, and overall vitality within a few weeks of consistent use.
Important Considerations Before Use
While garlic and lemon offer many health benefits, there are a few things to keep in mind before incorporating them into your routine:
Potential Side Effects:
Digestive discomfort: Garlic, when consumed in excess, can cause mild digestive issues, such as heartburn, bloating, or bad breath. To avoid discomfort, start with a small amount and gradually increase the dosage.
Blood-thinning properties: Garlic has natural blood-thinning properties, so if you are taking medications like blood thinners, it’s important to consult with a healthcare provider before adding large quantities of garlic to your diet.
Acidity: Lemon juice can be harsh on sensitive stomachs or for those who suffer from acid reflux. To mitigate acidity, dilute the lemon juice with more water or drink it with food.
Final Thoughts: A Simple Yet Effective Solution
Garlic and lemon provide a natural, cost-effective way to boost male performance, improve circulation, and enhance overall vitality. By incorporating this powerful combination into your daily routine, you can experience greater energy, stamina, and confidence in every aspect of your life. Whether you’re looking to elevate your performance in the bedroom or simply want to feel your best, garlic and lemon offer a simple solution that delivers results.
Start today with this easy-to-make remedy, and you’ll quickly see the difference it can make in your energy levels and physical performance. Embrace this natural powerhouse and unlock the full potential of your body—feel better, perform better, and thank me later!


: Nature’s Remedy for Liver and Kidney Health")


: A Natural Ally for Kidney Health")