Author

Barbara L.

Browsing

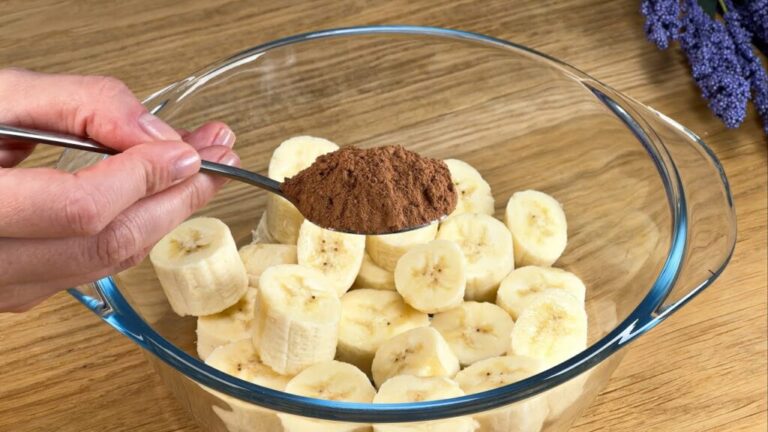
If you’re looking for a quick, healthy, and delicious dessert, combining bananas and cocoa is the perfect solution. This simple recipe is not only flourless and sugar-free but also packed with flavor and nutrients. Here’s how to make a tasty dessert using just bananas and cocoa!

Ingredients:

  • 2 ripe bananas
  • 2 tablespoons of unsweetened cocoa powder
  • 1 teaspoon of vanilla extract (optional)
  • A pinch of cinnamon (optional)
  • Nuts or dark chocolate chips (optional, for texture and added flavor)

Instructions:

1. Mash the Bananas:

  • Peel the bananas and place them in a bowl.
  • Use a fork or a potato masher to mash them into a smooth, creamy consistency.

2. Add Cocoa and Optional Ingredients:

  • Add the unsweetened cocoa powder to the mashed bananas and mix well until fully combined.
  • If you want to enhance the flavor, you can add a teaspoon of vanilla extract and a pinch of cinnamon for a warming touch.

3. Optional Add-ins:

  • For added texture and richness, stir in some crushed nuts like almonds or walnuts. If you prefer, you can also sprinkle in a few dark chocolate chips (preferably with no added sugar).

4. Prepare for Baking:

  • Preheat your oven to 350°F (175°C).
  • Pour the banana and cocoa mixture into a greased or lined baking dish (an 8×8-inch dish works well).

5. Bake:

  • Bake the dessert for about 20-25 minutes, or until the top is set and firm.
  • Let it cool for a few minutes before slicing into squares or bars.

6. Serve:

  • Enjoy your delicious banana and cocoa dessert as is, or top it with a dollop of whipped coconut cream or fresh berries for extra flavor.

Why You’ll Love This Dessert:

  • Naturally Sweet: Bananas provide natural sweetness, eliminating the need for refined sugar.
  • Healthy Fats: If you add nuts, you’ll get a dose of healthy fats that help you feel satisfied.
  • Flourless: No flour is needed, making this recipe gluten-free and suitable for those following a low-carb or grain-free diet.
  • Rich in Antioxidants: Cocoa is rich in antioxidants, which can help reduce inflammation and support heart health.

This banana and cocoa dessert is a great way to satisfy your sweet cravings while keeping things healthy and simple. It’s perfect for anyone looking for a guilt-free treat!

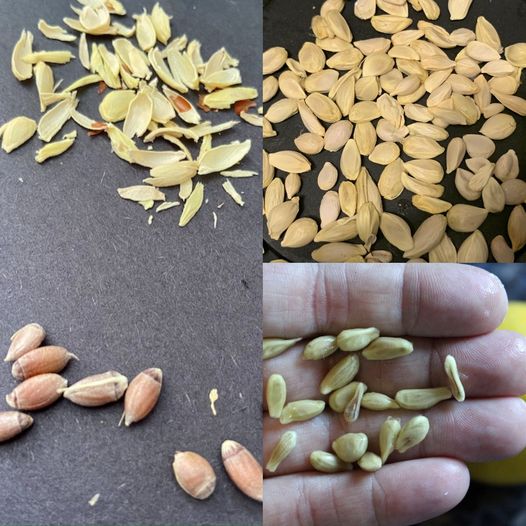
When you’re juicing lemons, it’s easy to overlook the tiny seeds that you usually throw away. But did you know that these seeds can be worth more than gold when used in the right way? If you’ve been discarding them without a second thought, it’s time to reconsider and explore their potential.

Lemons are highly prized for their distinct flavor and versatility in the culinary world. Not only are they packed with vitamin C, but their natural acidity also aids digestion and relieves bloating. Originally from Asia and widely grown in the Mediterranean, lemons have a long history of trade and cultural significance.

While we commonly use lemon juice, pulp, and zest in cooking, we tend to overlook the seeds. However, there are numerous ways to make the most of them. Here are some tips:

  1. Grow Your Own Lemon Tree:
    After using a lemon, don’t be too quick to discard the seeds. Instead, rinse them with room temperature water using a strainer. Then, dry them on a paper towel and remove their outer skin with tweezers. Place the seeds in a small container with damp cotton and leave them for about a week. You’ll start to see small shoots sprouting. Keep the environment moist to encourage further growth until the shoots develop roots. Once they’re ready, plant the seedlings in small pots with a mixture of soil and perlite for proper drainage. Give them plenty of light, warmth, and moisture, and watch your lemon saplings grow into fruitful trees!
  2. Create a Refreshing Fragrance:
    Lemon seeds can also be repurposed to create pleasant fragrances for your home. Simply rinse the seeds without removing their skin, as they retain their natural scent for an extended period. Place them in a small canvas bag and use them to infuse drawers, cabinets, or rooms with a refreshing lemon aroma. Hanging the bag near radiators in winter will release their delightful scent, making your home smell fresh and inviting.

In conclusion, don’t underestimate the hidden value of lemon seeds. From growing your own lemon tree to crafting aromatic experiences for your home, they offer a multitude of benefits. So, the next time you’re juicing lemons, remember to save those seeds and explore their full potential!

Garlic is not only a delicious ingredient in many dishes but also offers numerous health benefits. It’s no wonder that it is loved by both seasoned cooks and those who value natural remedies. But how can we ensure that our garlic stays fresh and flavorful for an extended period of time? Let’s explore a simple yet effective preservation method that will keep your garlic ready whenever you need it.

Preserving Garlic: The Secret Revealed

Garlic, known for its culinary and medicinal properties, can easily be preserved to maintain its freshness and potency. This incredible preservation method is a well-kept secret among experienced cooks. Despite its strong aroma, garlic is adored for its ability to elevate the taste of various dishes and boost overall health. And now, you can discover the secret to extend its shelf life.

Unveiling the Method

To keep your garlic intact for a year or more, all you need is half a kilo of garlic cloves and a few simple ingredients. Start by soaking the cloves in warm water for an hour. This will loosen the skins and make peeling effortless.

After drying the cloves, peel them and place them in a sterilized glass jar. Add two tablespoons of coarse salt, approximately 30 grams, to the jar. For preservation, incorporate a few tablespoons of apple cider or wine vinegar. The acidity in vinegar acts as a natural preservative, ensuring that the garlic remains fresh and full of flavor.

Next, boil some water and let it cool down. Pour the water into the jar, covering the cloves completely. Lastly, add a slice of lemon on top of the garlic before sealing the jar tightly. Give the jar a thorough shake to mix all the ingredients evenly.

The Convenience of Preserved Garlic Cloves

By following this tried-and-true technique, your garlic will stay fresh and intact for over a year. You will always have garlic at your fingertips, ready to be used whenever inspiration strikes. Say goodbye to tedious peeling, as these convenient preserved cloves are readily available for your culinary endeavors.

This preservation method, a favorite among seasoned cooks, guarantees optimal preservation and maximum flavor retention. Enjoy the convenience and benefits of having fresh garlic at your disposal year-round. No more trips to the grocery store just for garlic – it’s right there in your pantry, waiting to enhance your favorite recipes.

Now that you know the secret, why not give it a try? Start preserving your garlic today and enjoy the incredible flavors and health benefits it brings to your dishes.

Did you know that there’s a quick and easy way to repel flies, mosquitoes, and cockroaches in less than 10 minutes? Let me introduce you to an effective product and its simple application method.

Repelling Pests with a Natural Ingredient

By using a special and natural ingredient, you can efficiently deter mosquitoes, flies, and cockroaches. This powerful ingredient acts swiftly, clearing your living spaces from these pests within minutes. So, what’s the secret ingredient? It’s cloves!

Clove: A Powerful Natural Repellent

Cloves are the dried buds of the Eugenia caryophyllus plant. These little gems resemble small-headed nails when they mature. Not only have cloves been known since 200 BC in China for their therapeutic benefits, but they also offer antiseptic, analgesic, and refreshing properties. Their scent even enhances mental focus and purifies the environment.

But that’s not all! Cloves are highly effective as insect repellents, thanks to their strong aroma that insects like flies and cockroaches find unappealing. So, let’s explore how to use cloves to repel these pesky creatures.

Recipe for Clove-Based Insect Repellent

Creating a clove mixture to ward off insects is simple. Here’s what you’ll need:

  • A handful of cloves
  • 70-degree ethyl alcohol
  • Eucalyptus essential oil (known for its insect-repelling properties)
  • Coarse salt

Follow these steps to prepare the mixture:

  1. Place a handful of cloves in a small plastic container.
  2. Add some 70-degree ethyl alcohol.
  3. Drop a few drops of eucalyptus oil into the container.
  4. Fill the container halfway with coarse salt, then cover with more ethyl alcohol.
  5. Top with more cloves, a few more drops of eucalyptus oil, and additional ethyl alcohol.
  6. Finish by adding more salt, and your container is ready to use!

Application of the Clove Mixture

Now that you have your clove mixture ready, it’s time to put it to use. Deploy the container in areas prone to insect presence, such as kitchens, barbecue spots, and bedrooms. This effective solution can be prepared quickly and remains potent for several days, helping you maintain insect-free environments.

For even greater effectiveness, you can mix a little ethyl alcohol with 5 or 6 drops of eucalyptus oil in a bowl, apply it to surfaces, and wipe with a cloth for enhanced disinfection.

A Safe and Reliable Solution

This combination of natural ingredients provides a safe and reliable method to repel mosquitoes, flies, and cockroaches without the health risks associated with chemical-based products. It’s safe to use around children and pets, making it ideal for outdoor gatherings and ensuring a pest-free environment for your events.

Are you looking for a natural way to improve your home environment and well-being? Look no further than rosemary! This Mediterranean herb is not just for cooking – it has amazing properties that can transform your space into a sanctuary of relaxation and positivity.

Purify Your Air and Create a Fresh Atmosphere

When you burn a sprig of rosemary, it releases essential oils that have antimicrobial and antibacterial properties. These oils work their magic by eliminating bacteria and unpleasant odors in the air. In just 10 minutes of burning, you’ll notice a remarkable difference – a fresher and cleaner atmosphere that will leave you feeling rejuvenated.

Relax, Unwind, and Banish Stress

The calming scent of rosemary has long been known to reduce stress, anxiety, and muscle tension. Burning rosemary can help create a peaceful environment that promotes relaxation and tranquility. Imagine coming home after a long day and being greeted by the soothing aroma of rosemary – it’s like stepping into your own personal oasis.

Boost Your Focus and Productivity

If you find yourself struggling to concentrate, rosemary can come to the rescue. Its stimulating aroma has the power to clear your mind, sharpen your focus, and boost your productivity. Within minutes of burning rosemary, you’ll feel more alert and ready to tackle any task that comes your way.

Say Goodbye to Headaches and Migraines

Dealing with a pounding headache or a stubborn migraine? Rosemary smoke can be your secret weapon for relief. Thanks to its analgesic properties, inhaling rosemary smoke can help alleviate headaches and migraines, providing a much-needed sense of relaxation and calm.

Clear Negative Energy and Foster Positivity

In many cultures, rosemary is considered sacred and is believed to have the power to dispel negative energies. Burning rosemary can help create a space that is filled with positivity and vitality. Whether you’ve had a challenging day or you’re moving into a new home, burning a sprig of rosemary can cleanse the energy and bring a fresh start.

Safety First

Before you start burning rosemary, it’s important to ensure that you have a secure incense holder or a heat-resistant container to contain the smoke. Always supervise the burning process and make sure to fully extinguish the flame afterward.

In conclusion, taking just 10 minutes to burn a sprig of rosemary at home can have a profound impact on your environment and well-being. From purifying the air to promoting relaxation, enhancing focus, relieving headaches, and clearing negative energy, rosemary offers a simple and natural way to elevate your space. Embrace the power of rosemary and experience the incredible benefits it has to offer.

Drinking turmeric water is a simple way to incorporate the powerful health benefits of turmeric into your daily routine. Turmeric, specifically its active compound curcumin, is renowned for its anti-inflammatory, antioxidant, and medicinal properties. Here’s what happens to your body when you regularly drink turmeric water:

1. Reduction in Inflammation

  • How It Helps: Curcumin is a potent anti-inflammatory agent that can help reduce inflammation throughout the body. This is beneficial for managing conditions such as arthritis, where inflammation plays a key role in pain and stiffness.

2. Enhanced Antioxidant Capacity

  • Benefits: Turmeric boosts the body’s own antioxidant enzymes. This helps protect your cells from damage caused by free radicals, which are linked to aging and many diseases.

3. Improved Heart Health

  • Mechanism: Curcumin has a positive effect on heart health by improving the function of the endothelium, the lining of your blood vessels. It also reduces inflammation and oxidation, which are contributors to heart disease.

4. Support for Brain Health

  • Impact: Turmeric can increase the levels of brain-derived neurotrophic factor (BDNF), a type of growth hormone that functions in your brain. Higher levels of BDNF can delay or reverse brain diseases and age-related decreases in brain function.

5. Digestive Health

  • How It Helps: Turmeric can help stimulate the gallbladder to produce bile, making the digestive system more efficient. It may also help reduce symptoms of bloating and gas.

6. Detoxification

  • Process: Regular consumption of turmeric water may enhance liver function and improve its ability to detoxify the body more effectively.

7. Pain Relief

  • Benefits: The anti-inflammatory properties of turmeric can act as a natural pain reliever. It’s particularly effective in soothing joint pain and other aches caused by inflammation.

8. Skin Health

  • Appearance: Turmeric’s antioxidant properties contribute to natural glowing skin by revitalizing skin cells and reducing the appearance of signs of aging.

How to Make Turmeric Water

To reap these benefits, you can easily make turmeric water at home:

Ingredients:

  • 1/4 to 1/2 teaspoon of turmeric powder
  • 1 glass of warm water
  • Lemon juice and honey to taste (optional)

Instructions:

  1. Mix Turmeric: Add turmeric powder to a glass of warm water and stir well.
  2. Add Flavors: Squeeze a little lemon juice and add honey to taste, which can make the drink more palatable.
  3. Drink: Consume this drink, preferably on an empty stomach in the morning, to maximize absorption and effectiveness.

Considerations

  • Absorption: Curcumin is not absorbed very well by the body on its own. Consuming it with black pepper, which contains piperine, can enhance curcumin absorption by up to 2,000%.
  • Dosage: The benefits depend on consistency and dosage. While turmeric is generally safe, high doses or long-term use can cause digestive issues in some people.
  • Consult a Healthcare Provider: If you’re taking medication or have health concerns, discuss with your healthcare provider before starting any new health regimen, as turmeric can interact with certain medications, including blood thinners.

Incorporating turmeric water into your daily health routine can provide significant health benefits, from reducing inflammation to supporting heart and brain health.

Placing sea salt under your pillow is a practice rooted in various folk traditions and spiritual beliefs. Some people believe that sea salt has cleansing and protective properties that can influence sleep quality and emotional well-being. Here’s a look at why some choose to put sea salt under their pillow and what you might expect:

Purported Benefits of Sea Salt Under Your Pillow

  1. Spiritual Cleansing:
    • Sea salt is often considered a purifying agent in various spiritual and cultural practices. It’s thought to absorb negative energy and cleanse the environment, which could contribute to more restful sleep.
  2. Stress Reduction:
    • Some believe that salt can help reduce stress and anxiety, promoting a calming atmosphere conducive to sleep.
  3. Improved Sleep Quality:
    • The idea is that by absorbing negative energies, the sea salt helps create a tranquil environment that enhances sleep quality.
  4. Protection from Nightmares:
    • In some traditions, salt is thought to ward off bad spirits or negative influences that might cause nightmares.

How to Use Sea Salt for Sleep

  • Amount: As suggested, placing seven small piles or grains of sea salt under your pillow is the typical method. The number seven often holds spiritual significance, symbolizing completeness or perfection in various cultures.
  • Packaging the Salt: To prevent the salt from scattering and making a mess, you might want to put it in a small cloth bag or wrap it in a thin piece of cloth or tissue before placing it under the pillow.
  • Duration: You can try this for a few nights to see if you notice any changes in your sleep quality or mood upon waking.

Considerations and Precautions

  • Allergies and Respiratory Issues: If you have allergies or are sensitive to dust and particulates, ensure the salt is well-contained to avoid any irritation.
  • Placebo Effect: Much of the effectiveness of such practices can be attributed to the placebo effect. If you believe that placing sea salt under your pillow will help, you might be more likely to experience positive effects.
  • Cleanliness: Salt can attract moisture, so it’s a good idea to check periodically that the salt hasn’t caused any dampness or mildew under your pillow, especially in humid environments.

While there is no scientific backing to confirm the benefits of placing sea salt under your pillow, exploring such traditional practices can be an interesting way to connect with cultural rituals and might offer personal insights or comfort. If you find the practice helpful and it enhances your sleep without any downsides, it may be worth incorporating into your nighttime routine.

Chia seeds are highly regarded for their nutritional benefits and are often considered a superfood due to their high content of fiber, omega-3 fatty acids, proteins, and various micronutrients. While it’s an exaggeration to say that consuming one spoon a day of chia seeds will cleanse the liver and cure all diseases, integrating chia seeds into your diet can certainly contribute to overall health, including supporting liver function. Here’s how chia seeds can be beneficial:

Health Benefits of Chia Seeds

**1. Support Digestive Health:

  • Chia seeds are rich in fiber, which helps maintain bowel regularity and healthy digestion. This can indirectly support liver health by reducing the burden on the liver to detoxify and process waste products.

**2. Promote Heart Health:

  • The omega-3 fatty acids in chia seeds can help reduce inflammation, lower cholesterol, and maintain healthy blood pressure, all of which are beneficial for heart health.

**3. Stabilize Blood Sugar:

  • Chia seeds can slow the conversion of carbohydrates into sugar, helping to control blood sugar levels. This stabilization is crucial for people with diabetes and also helps maintain liver health.

**4. High in Antioxidants:

  • These tiny seeds are loaded with antioxidants that fight free radical damage and promote cellular repair, which might help in preventing further liver damage.

**5. Aid Weight Management:

  • Chia seeds expand and form a gel-like consistency when soaked in liquids, promoting a feeling of fullness and reducing appetite, which can help with weight management.

How to Use Chia Seeds

Daily Intake:

  • One tablespoon of chia seeds per day is sufficient to gain their health benefits. It’s important to start with a smaller amount and increase gradually to avoid digestive upset due to their high fiber content.

Incorporation into Diet:

  • Puddings: Mix chia seeds with milk or a milk alternative and let them soak overnight to make a pudding. Add fruits, nuts, or sweeteners according to taste.
  • Smoothies: Add a tablespoon of chia seeds to your smoothies for a nutritional boost.
  • Yogurt and Salads: Sprinkle chia seeds over yogurt or salads for added texture and nutrients.
  • Baking: Chia seeds can be used as an egg substitute in baking by mixing 1 tablespoon of chia seeds with 3 tablespoons of water and letting it sit for a few minutes to form a gel.

Considerations

  • Hydration: Due to their high fiber content, it’s essential to consume adequate fluids when adding chia seeds to your diet to prevent constipation.
  • Allergies: While rare, some people may be allergic to chia seeds. If you experience any adverse reactions, discontinue use and consult a healthcare provider.

While chia seeds are incredibly healthful and offer numerous benefits, it’s crucial to maintain realistic expectations about the effects of any single food on overall health. A balanced diet, combined with a healthy lifestyle, is the best approach to maintaining liver health and overall wellness.

Taking a daily spoonful of baking soda, or sodium bicarbonate, is a practice some people consider for various health benefits due to its alkaline properties. However, it’s important to approach this practice with caution and understand both the potential benefits and risks. Here’s a breakdown of what consuming baking soda daily might do to your body:

Potential Benefits of Baking Soda

  1. Neutralizes Stomach Acid:
    • Baking soda can quickly neutralize stomach acid, providing relief from heartburn and indigestion. It acts as an antacid, which is why it’s a common ingredient in over-the-counter antacid products.
  2. Enhances Athletic Performance:
    • Some studies suggest that baking soda can act as an ergogenic aid, meaning it might help enhance physical performance. It does this by buffering lactic acid buildup in muscles during intense exercise, potentially improving endurance and reducing fatigue.
  3. May Improve Kidney Health:
    • For individuals with chronic kidney disease, who often suffer from acidosis (excessive acidity of the body fluids), taking baking soda could help to manage the condition and support kidney function.
  4. May Influence Urinary Tract Infections:
    • By making the bladder environment more alkaline, baking soda might help reduce the severity and recurrence of UTIs, although more research is needed in this area.

Considerations and Risks

  1. Dosage Concerns:
    • The amount and concentration of baking soda taken daily is crucial. Too much can disrupt the body’s acid-base balance, leading to metabolic alkalosis, a condition characterized by excessive alkalinity in the body.
  2. Side Effects:
    • Possible side effects include increased thirst, stomach cramps, gas, and more severe effects like swelling of the feet or legs due to sodium overload.
  3. Interactions with Medications:
    • Baking soda can interact with various medications, including prescription drugs, over-the-counter medicines, and other dietary supplements. This can affect how drugs are absorbed or how they work.
  4. Not Suitable for Everyone:
    • People with high blood pressure or those on sodium-restricted diets should avoid taking baking soda due to its high sodium content. It can exacerbate conditions related to sodium imbalance.

How to Use Safely

  • Consult a Healthcare Provider: Before starting any routine involving baking soda, especially daily intake, consult with a healthcare provider to discuss your health conditions and potential risks.
  • Appropriate Dosage: If approved, ensure you’re consuming the correct dosage. Typically, for antacid use, a half teaspoon of baking soda is mixed in at least 4 ounces of water and taken 1 to 2 hours after meals; not to exceed seven half-teaspoon doses in a 24-hour period.

In summary, while a daily spoonful of baking soda might offer certain health benefits, it is vital to use it cautiously and under medical supervision to avoid adverse effects. It’s always best to rely on a balanced diet and healthy lifestyle choices for managing health issues and improving overall well-being.

Guava leaves are an underappreciated gem in the realm of natural remedies, offering a host of health benefits that can impact various aspects of wellness. Rich in antioxidants, vitamins, and anti-inflammatory agents, guava leaves can be used in teas, extracts, and even topical applications. Here are 15 incredible reasons to start incorporating guava leaf tea or extracts into your daily routine:

1. Rich in Antioxidants

  • Guava leaves are loaded with powerful antioxidants like vitamin C and flavonoids, which help combat free radicals and boost overall health.

2. Anti-Inflammatory Properties

  • They contain high levels of anti-inflammatory agents, which can reduce inflammation and help manage conditions like arthritis.

3. Improves Heart Health

  • Guava leaves enhance heart health by lowering blood pressure and bad cholesterol levels while increasing good cholesterol.

4. Aids in Weight Loss

  • The leaves help in weight loss by preventing complex starches from converting into sugars, fostering better control over metabolic rates.

5. Diabetes Management

  • Guava leaf tea can help regulate blood sugar levels by preventing the absorption of sucrose and maltose.

6. Supports Digestive Health

  • With their antibacterial properties, guava leaves can combat pathogens in the gut and stop proliferation of toxic enzymes by bacteria.

7. Enhances Skin Health

  • The antioxidants and vitamins in guava leaves can help improve skin tone and texture, reduce acne, and minimize signs of aging.

8. Boosts Immune System

  • High levels of vitamin C in guava leaves boost immune function and help in fighting off infections and illnesses.

9. Reduces Risk of Cancer

  • The high levels of quercetin found in guava leaves are effective in reducing cancerous growth by inhibiting the proliferation of cancer cells.

10. Dental Care

  • Guava leaves have antimicrobial properties that help in treating oral infections and reducing inflammation of the gums.

11. Stress-Buster

  • The compounds in guava leaves can help soothe the nerves and decrease stress hormones in the body.

12. Hair Loss

  • Guava leaves can be boiled and massaged onto the scalp to prevent hair loss, thanks to their rich nutrient content.

13. Improves Sleep

  • Drinking guava leaf tea helps in calming nerves and quieting the mind, which can improve sleep quality.

14. Menstrual Pain Relief

  • Consuming guava leaf tea can help reduce menstrual cramps due to its potent anti-inflammatory and analgesic properties.

15. Heals Cold and Cough

  • Guava leaf tea is effective in treating cold and cough by reducing mucus, disinfecting the respiratory tract, throat, and lungs.

How to Use Guava Leaves

Making Guava Leaf Tea:

  • Ingredients: A handful of fresh or dried guava leaves.
  • Instructions: Boil the leaves in water for about 10 minutes. Strain the water and drink it either warm or cooled. You may add honey or lemon for flavor.

Topical Application for Skin and Hair:

  • Boil leaves and allow the solution to cool. Apply it to the skin to fight acne or onto the scalp to improve hair health.

Caution

  • Always consult with a healthcare provider before starting any new treatment, especially if you have underlying health conditions or are pregnant.

Incorporating guava leaves into your diet or beauty regimen can offer you a plethora of health benefits, making them a versatile and powerful natural remedy worth trying.