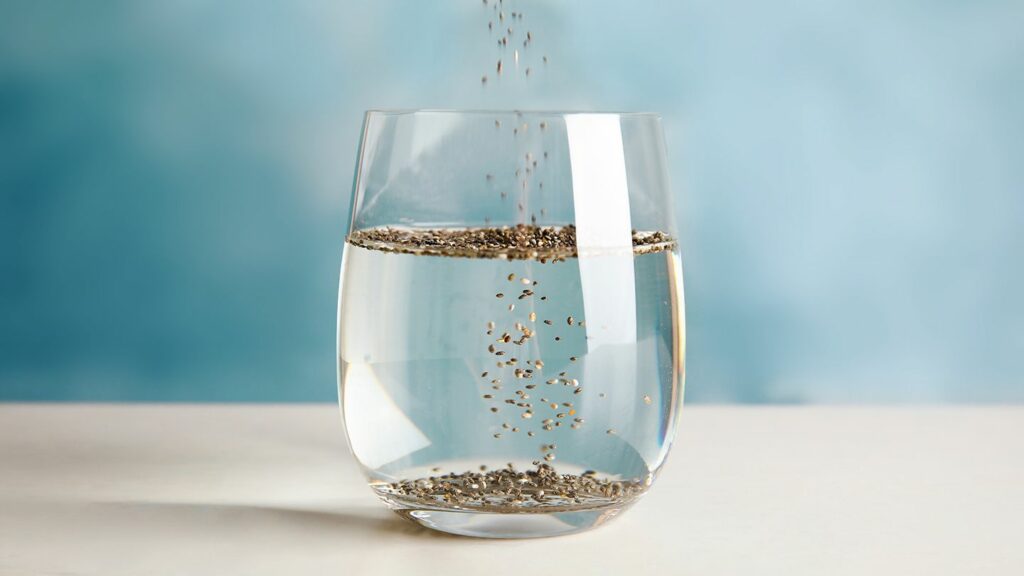
Author

Barbara L.

Browsing


Garlic is a powerhouse of nutrients, and when consumed in the form of garlic water, it offers numerous health benefits. Garlic water is a natural remedy packed with antioxidants, vitamins, and minerals that can help support the immune system, improve heart health, and even boost digestion. Here’s a closer look at the benefits of garlic water and how you can easily prepare it at home.

Benefits of Drinking Garlic Water:

  1. Boosts Immunity
    • Garlic is rich in antioxidants and compounds like allicin, which help strengthen the immune system and fight off infections. Drinking garlic water regularly can help protect against colds, flu, and other illnesses.
    • Benefit: Enhances immune function and protects against infections.
  2. Improves Heart Health
    • Garlic is known for its ability to reduce cholesterol levels and lower blood pressure. By helping to reduce the buildup of plaque in arteries and improving circulation, garlic water can support heart health and lower the risk of cardiovascular diseases.
    • Benefit: Lowers blood pressure, reduces cholesterol, and supports overall heart health.
  3. Detoxifies the Body
    • Garlic has detoxifying properties that help flush out toxins from the body. Drinking garlic water can promote liver function and assist in the elimination of harmful substances from your system.
    • Benefit: Promotes detoxification and supports liver health.
  4. Promotes Digestive Health
    • Garlic stimulates the production of digestive enzymes, helping to improve digestion and alleviate issues like bloating, gas, and constipation. It also acts as a natural prebiotic, promoting the growth of beneficial gut bacteria.
    • Benefit: Supports healthy digestion and relieves digestive discomfort.
  5. Reduces Inflammation
    • Garlic has powerful anti-inflammatory properties that can help reduce inflammation in the body. This can be especially beneficial for people suffering from conditions like arthritis or other inflammatory diseases.
    • Benefit: Reduces inflammation and provides relief from conditions like arthritis.
  6. Regulates Blood Sugar Levels
    • Garlic can help regulate blood sugar levels by improving insulin sensitivity. This makes garlic water a great addition to the diet of individuals managing diabetes or looking to stabilize their blood sugar levels.
    • Benefit: Helps manage blood sugar levels and supports diabetes management.
  7. Aids in Weight Loss
    • Garlic water can boost metabolism and help in fat burning, making it easier to manage weight. It also helps control appetite, reducing unnecessary cravings and overeating.
    • Benefit: Supports weight loss by boosting metabolism and controlling appetite.
  8. Antibacterial and Antiviral Properties
    • Garlic is known for its natural antibacterial and antiviral properties, which help the body fight off harmful bacteria and viruses. Drinking garlic water can assist in preventing infections and maintaining overall health.
    • Benefit: Fights bacterial and viral infections, promoting better overall health.
  9. Promotes Skin Health
    • The antioxidants in garlic help combat free radical damage, reducing signs of aging and promoting clearer skin. Garlic water can also help fight acne and other skin conditions.
    • Benefit: Improves skin health, reducing signs of aging and preventing acne.

How to Make Garlic Water:

Ingredients:

  • 2-3 cloves of fresh garlic
  • 1 cup of water
  • Lemon juice (optional, for flavor)
  • Honey (optional, for flavor)

Instructions:

  1. Crush the Garlic Cloves:
    • Peel 2-3 cloves of garlic and crush them lightly using the flat side of a knife or a garlic press. Crushing the garlic helps activate allicin, the compound responsible for most of its health benefits.
  2. Boil the Water:
    • In a small pot, bring 1 cup of water to a boil.
  3. Add the Garlic:
    • Once the water reaches a boil, remove it from the heat and add the crushed garlic cloves.
  4. Let It Steep:
    • Allow the garlic to steep in the hot water for about 5-10 minutes. This will extract the beneficial compounds from the garlic into the water.
  5. Strain the Water:
    • After steeping, strain the garlic out of the water.
  6. Optional Flavor Additions:
    • If desired, you can add a squeeze of lemon juice or a teaspoon of honey to improve the flavor of the garlic water.
  7. Drink Warm:
    • Sip the garlic water while it’s still warm for the best results. You can drink garlic water in the morning on an empty stomach or at any time during the day.

Precautions:

  • Moderation: While garlic water has many health benefits, it’s important to consume it in moderation. Drinking too much garlic water can cause digestive discomfort or irritation.
  • Consult a Doctor: If you are pregnant, nursing, or have underlying medical conditions, consult your healthcare provider before adding garlic water to your routine, especially if you’re on blood-thinning medications.

Conclusion:

Drinking garlic water is a simple and effective way to improve your overall health. From boosting immunity and heart health to supporting digestion and skin health, the benefits of garlic water are numerous. Incorporating this natural remedy into your daily routine can offer a range of health advantages while providing a refreshing and flavorful drink. Try making garlic water today and unlock the powerful health benefits of this humble yet potent ingredient!


Drinking garlic water in moderation provides numerous health benefits, such as boosting immunity, supporting heart health, and improving digestion. However, drinking excessive amounts of garlic water can have both positive and negative effects on your body. While garlic is a potent natural remedy, consuming too much can lead to potential side effects. Here’s what happens to your body when you drink a lot of garlic water.

Positive Effects of Drinking Garlic Water:

  1. Enhanced Immune System:
    • Garlic is rich in antioxidants and compounds like allicin, which strengthen the immune system and protect against infections. Drinking garlic water in large amounts can give your immune system a powerful boost, helping your body fight off colds, flu, and other illnesses.
    • Effect: Improved resistance to infections, faster recovery from illnesses.
  2. Lower Blood Pressure:
    • Garlic has natural blood pressure-lowering properties. Drinking large amounts of garlic water can cause a significant drop in blood pressure, which is beneficial for people with hypertension but could be risky for those with already low blood pressure.
    • Effect: Lowered blood pressure, which may help prevent heart disease but can cause dizziness or fainting in those with normal or low blood pressure.
  3. Improved Heart Health:
    • Garlic helps reduce bad cholesterol (LDL) and improve circulation, which is beneficial for heart health. Drinking a lot of garlic water may further enhance these cardiovascular benefits, but too much can also cause thinning of the blood.
    • Effect: Reduced cholesterol levels and improved circulation, but excessive consumption may lead to an increased risk of bleeding.
  4. Improved Digestion:
    • Garlic stimulates the production of digestive enzymes and promotes gut health. Drinking garlic water in large amounts can improve digestion, but it may also lead to gastrointestinal discomfort for some people.
    • Effect: Enhanced digestion, but potentially more gas, bloating, or stomach cramps if overconsumed.
  5. Detoxification:
    • Garlic is known to detoxify the body by promoting liver function. Drinking garlic water can accelerate detoxification processes, flushing out toxins. However, too much garlic water may strain the liver or kidneys if consumed in excess.
    • Effect: Faster detoxification, but potential strain on the liver and kidneys.

Negative Effects of Drinking Too Much Garlic Water:

  1. Digestive Issues:
    • While garlic aids digestion in moderate amounts, drinking a lot of garlic water can irritate the stomach and lead to gastrointestinal issues such as gas, bloating, and diarrhea. The sulfur compounds in garlic can also cause a strong odor in sweat and breath.
    • Effect: Digestive discomfort, such as gas, bloating, or diarrhea, and bad breath or body odor.
  2. Risk of Bleeding:
    • Garlic is a natural blood thinner, which helps prevent blood clots. However, drinking too much garlic water can increase the risk of excessive bleeding, especially for people who are on blood-thinning medications or have bleeding disorders.
    • Effect: Increased risk of bleeding and bruising, particularly for those on anticoagulants.
  3. Drop in Blood Pressure:
    • While garlic is effective at lowering blood pressure, consuming large quantities can cause blood pressure to drop too much, leading to dizziness, lightheadedness, or fainting. This can be dangerous for people with normal or low blood pressure.
    • Effect: Hypotension (low blood pressure), which can cause dizziness or fainting.
  4. Allergic Reactions:
    • Some people are allergic to garlic, and drinking too much garlic water could trigger allergic reactions such as skin rashes, itching, and difficulty breathing. If you suspect you’re allergic to garlic, avoid consuming large amounts.
    • Effect: Potential allergic reactions like rashes, swelling, or breathing difficulties.
  5. Liver and Kidney Strain:
    • Although garlic is detoxifying, overconsumption can put strain on the liver and kidneys, particularly in people with pre-existing liver or kidney conditions. Large amounts of garlic water could overwhelm the body’s detoxification system.
    • Effect: Increased strain on the liver and kidneys, potentially leading to discomfort or complications.
  6. Interference with Medications:
    • Garlic can interact with certain medications, especially blood thinners like warfarin or aspirin. Drinking too much garlic water can amplify the effects of these medications, leading to dangerous side effects such as uncontrolled bleeding.
    • Effect: Interference with medications, particularly anticoagulants, potentially leading to dangerous side effects.

Recommended Dosage:

For most people, drinking garlic water in moderation—about 1-2 cloves of garlic steeped in water daily—is safe and provides health benefits. If you’re considering increasing your intake, it’s essential to consult a healthcare provider, especially if you’re on medications or have underlying health conditions.


Are you tired of dealing with flies, mosquitoes, and cockroaches invading your home? There’s a simple, natural solution that can help keep these pests at bay. By using bay leaves and cloves, you can create an environment that these unwelcome guests simply won’t tolerate.

Why Bay Leaves and Cloves?

Bay Leaves: These aromatic leaves are not just for flavoring soups and stews. Bay leaves have a strong scent that is pleasant to humans but repellent to many insects. They contain essential oils that are known to deter pests effectively.

Cloves: These tiny, potent buds are a staple in many kitchens for their warm, spicy flavor. However, cloves also have strong insect-repelling properties thanks to a compound called eugenol, which is disliked by many bugs.

How to Use Bay Leaves and Cloves to Repel Pests

Creating a pest-repelling mixture with bay leaves and cloves is easy and can be done with items you likely already have in your pantry.

  1. Gather Your Ingredients:
    • A handful of dried bay leaves
    • A handful of whole cloves
  2. Preparation:
    • Place the bay leaves and cloves in a small bowl or a sachet. You can use a simple cloth bag or even a piece of breathable fabric tied with a string.
  3. Placement:
    • Put the bowl or sachet in areas where you commonly see flies, mosquitoes, or cockroaches. Ideal spots include kitchen counters, near windows, and entryways.
    • For a more widespread effect, consider making several small sachets and placing them throughout your home.

How It Works

When you leave these natural repellents out for an hour, the strong scents released by the bay leaves and cloves will start to permeate the air. Flies, mosquitoes, and cockroaches have a very keen sense of smell and are repelled by the fragrance of these ingredients. The effect is not just immediate but can also help keep pests away for an extended period.

Additional Tips

  • Refresh Regularly: To maintain their effectiveness, replace the bay leaves and cloves every few weeks. Over time, their scents can fade.
  • Combine with Other Methods: While bay leaves and cloves are great natural repellents, combining them with good hygiene practices, like keeping your home clean and food stored properly, will enhance their effectiveness.

Conclusion

Using bay leaves and cloves is a natural, pleasant-smelling way to help rid your home of unwanted pests like flies, mosquitoes, and cockroaches. It’s an easy and affordable solution that can make your home a more comfortable place without the need for harsh chemicals. Give it a try and enjoy a pest-free environment!


Looking for a delicious and easy-to-make dessert to enjoy this summer? Try whipping condensed milk with coffee! This no-bake treat is quickly becoming a favorite, and the best part is, you don’t need any added sugar. Let’s dive into how you can make this refreshing dessert in just a few simple steps.

Why This Dessert?

Combining the rich creaminess of condensed milk with the bold flavor of coffee creates a perfectly balanced dessert. It’s creamy, flavorful, and perfect for warm weather. Plus, it requires no baking, making it ideal for those hot summer days when you want to avoid turning on the oven.

Ingredients You’ll Need

  • 1 can of sweetened condensed milk
  • 2 tablespoons of instant coffee (or 1 shot of espresso for a stronger flavor)
  • 1 cup of heavy cream
  • Ice cubes (optional for serving)

Step-by-Step Preparation

  1. Whip the Cream:
    • Start by pouring the heavy cream into a large mixing bowl. Using an electric mixer, whip the cream until it forms stiff peaks. This should take about 3-5 minutes.
  2. Add the Condensed Milk:
    • Gently fold the sweetened condensed milk into the whipped cream. Make sure to mix it thoroughly but gently to maintain the fluffy texture.
  3. Incorporate the Coffee:
    • Dissolve the instant coffee in a small amount of hot water (about 2 tablespoons) to make a concentrated coffee solution. If using espresso, you can skip this step.
    • Gradually add the coffee mixture to the cream and condensed milk blend, stirring gently until well combined.
  4. Chill and Serve:
    • Once everything is well mixed, transfer the mixture into serving bowls or glasses. Chill in the refrigerator for at least 2 hours to allow the flavors to meld and the dessert to firm up.
    • For an extra refreshing touch, serve with ice cubes or chilled.

Tips for the Best Experience

  • Experiment with Flavors: You can add a hint of vanilla extract or a sprinkle of cinnamon for an added layer of flavor.
  • Serving Suggestions: Top with a few coffee beans, a dusting of cocoa powder, or a dollop of whipped cream for a beautiful presentation.
  • Make it Ahead: This dessert can be made in advance and kept in the refrigerator, making it a convenient option for entertaining guests or having a ready-to-eat treat on hand.

Conclusion

This whipped condensed milk with coffee dessert is a simple yet luxurious treat that’s perfect for summer. It combines the creamy sweetness of condensed milk with the robust flavor of coffee, creating a delightful dessert without the need for added sugar or baking. Give it a try and enjoy a cool, delicious treat that’s sure to become a favorite in your household!


Winter is the perfect time to enjoy the rich, tangy flavor of black currants. These little berries are packed with nutrients and can add a delicious twist to your winter meals. Here are three fantastic black currant recipes that are easy to make and perfect for the colder months.

1. Black Currant Compote

Ingredients:

  • 2 cups black currants (fresh or frozen)
  • 1/2 cup water
  • 1/4 cup honey (optional)
  • 1 teaspoon lemon juice

Instructions:

  1. Combine Ingredients: In a medium saucepan, combine black currants, water, honey, and lemon juice.
  2. Cook: Bring to a boil over medium heat, then reduce the heat and simmer for about 10-15 minutes, until the berries have softened and the mixture thickens slightly.
  3. Cool and Serve: Let the compote cool. Serve it warm or chilled over yogurt, oatmeal, or even pancakes.

2. Black Currant Tea

Ingredients:

  • 1 cup black currants (fresh or dried)
  • 4 cups water
  • Honey or sweetener to taste
  • Lemon slices (optional)

Instructions:

  1. Boil Water: Bring the water to a boil in a large pot.
  2. Add Currants: Add the black currants and reduce the heat. Let it simmer for about 10 minutes.
  3. Strain and Serve: Strain the tea into cups. Add honey or your preferred sweetener and a slice of lemon if desired. Enjoy a warm, soothing drink perfect for winter evenings.

3. Black Currant Sauce for Meat

Ingredients:

  • 1 cup black currants (fresh or frozen)
  • 1/2 cup red wine (optional)
  • 1/4 cup balsamic vinegar
  • 2 tablespoons honey
  • 1 teaspoon fresh rosemary, chopped
  • Salt and pepper to taste

Instructions:

  1. Combine Ingredients: In a saucepan, combine black currants, red wine, balsamic vinegar, honey, and rosemary.
  2. Cook: Bring to a boil, then reduce heat and simmer for about 15 minutes, until the sauce thickens.
  3. Season and Serve: Season with salt and pepper to taste. Serve the sauce warm over roasted meats like chicken, pork, or beef for a delicious, gourmet touch.

Conclusion

These three black currant recipes are not only easy to prepare but also bring a delightful burst of flavor to your winter table. Whether you’re looking for a sweet compote, a warming tea, or a savory sauce, black currants can be the star ingredient that elevates your meals. Enjoy the taste and health benefits of this wonderful berry all winter long!


Cockroaches can be a persistent nuisance in any home. Luckily, there are several natural methods to keep these pests at bay without resorting to harsh chemicals. Here are 12 effective and natural ways to get rid of cockroaches permanently.

1. Keep Your Home Clean

A clean home is less attractive to cockroaches. Regularly sweep, mop, and wipe down surfaces, especially in the kitchen and dining areas. Make sure to store food in sealed containers.

2. Seal Cracks and Gaps

Cockroaches can enter your home through the tiniest of openings. Inspect your home for cracks and gaps, especially around doors, windows, and baseboards, and seal them with caulk.

3. Use Baking Soda and Sugar

Mix equal parts baking soda and sugar and sprinkle it in areas where you’ve seen cockroaches. The sugar attracts them, and the baking soda acts as a natural poison.

4. Essential Oils

Cockroaches dislike the smell of certain essential oils. Mix a few drops of peppermint, eucalyptus, or tea tree oil with water and spray it around entry points and suspected hiding places.

5. Bay Leaves

Bay leaves are a natural cockroach repellent. Place dried bay leaves in cupboards, drawers, and other areas where cockroaches are likely to hide.

6. Diatomaceous Earth

Sprinkle food-grade diatomaceous earth in areas where cockroaches travel. It dehydrates and kills them, but is safe for humans and pets.

7. Lemon Peels

Cockroaches are repelled by the scent of lemon. Place lemon peels in areas where cockroaches are a problem, or wash surfaces with lemon juice.

8. Boric Acid

Mix boric acid with a little flour and sugar to make a dough. Place small balls of the dough in corners and other hiding spots. Boric acid is highly effective at killing cockroaches.

9. Catnip

Catnip contains nepetalactone, which is a natural cockroach repellent. Scatter catnip in problem areas or make a tea and spray it around your home.

10. Garlic

Cockroaches dislike the smell of garlic. Place crushed garlic cloves in areas where you have seen cockroaches.

11. Cucumber Slices

Fresh cucumber slices can repel cockroaches. Place them in areas where you’ve noticed activity.

12. Keep Trash Covered

Make sure all trash cans have tight-fitting lids and empty them regularly. This removes a major food source for cockroaches.

Conclusion

By using these natural methods, you can keep cockroaches at bay and enjoy a pest-free home. Remember, consistency is key. Keep your home clean, seal entry points, and use these natural repellents regularly to achieve the best results. Say goodbye to cockroaches and enjoy a cleaner, healthier living environment


Are you looking for a natural way to boost hair growth and reduce hair fall? Aloe vera might be the answer. Known for its powerful healing properties, aloe vera can also work wonders for your hair. Let’s explore how this amazing plant can help your hair grow like crazy and stay strong.

Why Aloe Vera?

Aloe vera is packed with vitamins, minerals, and enzymes that nourish the scalp and hair. It’s been used for centuries to treat various hair and scalp issues, making it a trusted ingredient in natural hair care.

Benefits of Aloe Vera for Hair

  1. Promotes Hair Growth: Aloe vera contains enzymes that help remove dead skin cells from the scalp, promoting hair growth. It also improves blood circulation, ensuring your hair follicles get the nutrients they need.
  2. Reduces Hair Fall: The nutrients in aloe vera, such as vitamins A, C, and E, strengthen hair strands and prevent breakage, significantly reducing hair fall.
  3. Moisturizes Scalp and Hair: Aloe vera’s high water content and hydrating properties help keep the scalp and hair moisturized, preventing dryness and flakiness.
  4. Balances Scalp pH: Aloe vera helps maintain a healthy scalp pH balance, which is essential for preventing dandruff and other scalp conditions.
  5. Repairs and Strengthens: The proteolytic enzymes in aloe vera repair dead skin cells on the scalp, improving the overall health of your hair and making it stronger.

How to Use Aloe Vera for Hair

1. Aloe Vera Gel:

  • Ingredients: Fresh aloe vera leaf
  • Preparation: Extract the gel from a fresh aloe vera leaf and apply it directly to your scalp and hair. Massage it in and leave it on for 30 minutes before rinsing with a mild shampoo. Repeat 2-3 times a week for best results.

2. Aloe Vera and Coconut Oil Mask:

  • Ingredients: 2 tablespoons of aloe vera gel, 2 tablespoons of coconut oil
  • Preparation: Mix the aloe vera gel and coconut oil. Apply the mixture to your scalp and hair, focusing on the roots. Leave it on for about an hour, then wash it out with a gentle shampoo. This mask provides deep conditioning and strengthens hair.

3. Aloe Vera and Honey Conditioner:

  • Ingredients: 3 tablespoons of aloe vera gel, 2 tablespoons of honey
  • Preparation: Combine the aloe vera gel and honey. Apply the mixture to damp hair, leave it on for 20 minutes, and then rinse thoroughly. This conditioner adds shine and softness to your hair.

Conclusion

Aloe vera is a natural, effective solution for promoting hair growth and reducing hair fall. Its rich nutrients and moisturizing properties make it an excellent addition to your hair care routine. Try these simple aloe vera treatments and enjoy stronger, healthier hair that grows beautifully. Say goodbye to hair worries and embrace the natural power of aloe vera!


Aloe vera gel is a wonderful natural remedy for skin and hair care, but it’s important to know how to preserve it properly to ensure it stays fresh and effective. Here’s a friendly guide on how to preserve aloe vera gel at home, so you can enjoy its benefits anytime.

Why Preserve Aloe Vera Gel?

Fresh aloe vera gel can spoil quickly if not stored properly, losing its beneficial properties. By preserving it, you can extend its shelf life and have a ready supply for your skin and hair care needs.

Step-by-Step Guide to Preserve Aloe Vera Gel

1. Harvest the Gel:

  • Select a Healthy Leaf: Choose a thick, healthy leaf from the base of the aloe vera plant. Older leaves tend to have more gel.
  • Cut and Extract: Cut the leaf close to the base, wash it thoroughly, and let it sit upright in a bowl for 10-15 minutes to allow the yellow latex to drain out. This latex can be irritating to the skin.
  • Peel and Scoop: Using a sharp knife, peel off the outer skin and scoop out the clear gel with a spoon.

2. Blend the Gel:

  • Place the scooped gel in a blender and blend until smooth. This will help in even preservation and easier application later.

3. Add a Natural Preservative:

  • Vitamin C or E: Adding a natural preservative like vitamin C or E can help extend the shelf life of the aloe vera gel. Add one teaspoon of vitamin C powder or squeeze the oil from two vitamin E capsules into the blended gel and mix well.

4. Store Properly:

  • In the Refrigerator: Transfer the blended and preserved aloe vera gel into a clean, airtight container. Store it in the refrigerator where it can last for up to one week.
  • Freezing: For longer storage, pour the gel into ice cube trays and freeze. Once frozen, transfer the aloe vera cubes to a zip-lock bag or airtight container and keep them in the freezer. This way, the gel can last for up to six months. Simply take out a cube when needed and let it thaw before use.

Additional Tips

  • Label and Date: Always label your container with the date you prepared the gel to keep track of its freshness.
  • Hygiene is Key: Use clean utensils and containers to avoid contamination and ensure the longest shelf life possible.
  • Avoid Metal Containers: Store the gel in glass or plastic containers, as metal can react with the gel and reduce its effectiveness.

Conclusion

Preserving aloe vera gel at home is simple and ensures that you always have this natural remedy at hand. Whether you choose to refrigerate or freeze it, properly stored aloe vera gel can provide lasting benefits for your skin and hair. Follow these easy steps to enjoy fresh, effective aloe vera gel anytime you need it!


A clean washing machine is key to having fresh, pleasant-smelling laundry. One of the best natural solutions for maintaining your machine is vinegar. This simple household item is a powerful cleaner that can help eliminate odors, remove residue, and keep your washing machine in top condition. Let’s explore how you can use vinegar to keep your machine and laundry fresh.

Why Vinegar?

Vinegar is a versatile cleaning agent. Its natural acidity helps break down mineral deposits, soap scum, and mildew that can build up inside your washing machine. Plus, it neutralizes odors, leaving your machine smelling clean and your clothes fresh.

What You’ll Need

For this cleaning method, you’ll need:

  • White vinegar
  • A clean cloth or sponge
  • A small brush (an old toothbrush works great)

Step-by-Step Guide to Cleaning Your Washing Machine

  1. Empty the Machine: Make sure there are no clothes inside the washing machine.
  2. Add Vinegar: Pour two cups of white vinegar directly into the drum of the machine. Vinegar will help break down any buildup and neutralize odors.
  3. Run a Hot Cycle: Set your washing machine to run on the hottest and longest cycle available. This will allow the vinegar to thoroughly clean the inside of the machine.
  4. Wipe Down the Drum: Once the cycle is complete, use a clean cloth or sponge to wipe down the inside of the drum. This helps remove any loosened residue.
  5. Clean the Dispensers: Remove any detergent or fabric softener dispensers and soak them in a mixture of warm water and vinegar. Use a small brush to scrub away any buildup before rinsing and replacing them.
  6. Run a Rinse Cycle: To ensure all vinegar is rinsed out, run a second cycle with just water.

Tips for Ongoing Maintenance

  • Regular Cleaning: Aim to clean your washing machine with vinegar once a month. This prevents buildup and keeps your machine running efficiently.
  • Leave the Door Open: After each wash, leave the door or lid of your machine open to allow it to air out and prevent mold and mildew growth.
  • Check the Gasket: If you have a front-loading machine, regularly check and wipe the rubber gasket around the door. This area is prone to mold and mildew.

Conclusion

Using vinegar to clean your washing machine is a simple, natural way to keep it running smoothly and your laundry smelling fresh. With a little regular maintenance, you can avoid unpleasant odors and ensure your clothes come out clean and pleasant every time. Give this method a try and enjoy the benefits of a fresh, well-maintained washing machine!

Avocado seeds are often discarded without a second thought, but these overlooked byproducts have more uses than you might realize. While consuming avocado seeds can be controversial due to potential toxicity concerns, there are numerous safe and beneficial ways to utilize them. Let’s explore some innovative uses of avocado seeds that can add value to your daily life.

1. Natural Dye

Avocado seeds can be used to create a beautiful natural dye that ranges from pink to peach to brown, depending on the treatment and fabric. This can be an exciting project for DIY enthusiasts looking to explore natural dyeing techniques.

How to Make the Dye:

  • Simmer crushed avocado seeds in water for several hours until the desired color strength is achieved.
  • Strain the liquid and use it to dye fabrics, yarns, or even paper.

2. Plant Water Enrichment

Instead of throwing away your avocado seeds, use them to enrich water for other plants. The seeds contain nutrients that can be released into the water, providing a mild fertilizer.

Steps:

  • Rinse and clean the seeds, then place them in a jar of water.
  • Use this nutrient-rich water for your household plants.

3. Exfoliating Scrub

Avocado seeds can be ground into a fine powder and used as a natural exfoliating scrub. This is a great way to recycle the seeds and care for your skin.

Recipe:

  • Dry the seeds, then grind them into a fine powder.
  • Mix with a base like coconut oil or honey for a natural body scrub.

4. Decorative Carvings

Avocado seeds can be carved into beautiful, intricate designs for ornaments or jewelry. This requires some craftsmanship but can be a rewarding and eco-friendly hobby.

Tips:

  • Let the seed dry slightly so it’s easier to carve, but not so much that it becomes too hard.

5. Homemade Toys

For those who enjoy crafting, avocado seeds can be turned into maracas or painted to create eco-friendly toys for children.

How to Do It:

  • Clean and dry the seeds.
  • Fill them with small beads and seal them for use as shakers.

Conclusion

Avocado seeds don’t have to be waste products. With a little creativity, they can be transformed into useful, artistic, and eco-friendly items. By exploring these alternatives, you not only add value to what is commonly discarded but also engage in sustainable practices that benefit the environment. Next time you enjoy an avocado, think twice before you toss the seed!